
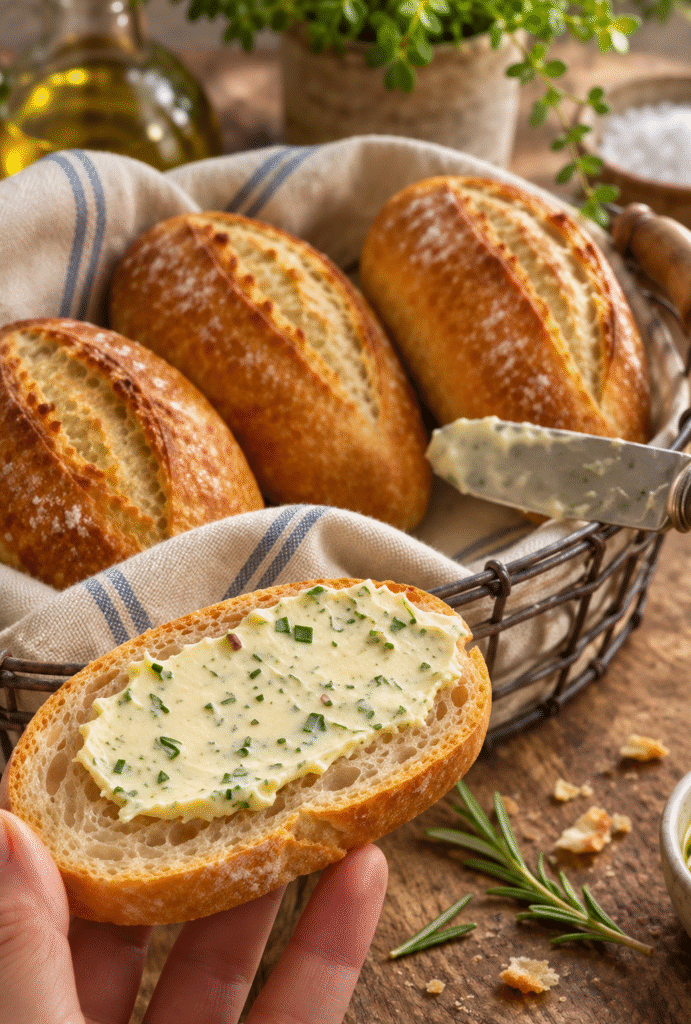
Mini French Baguettes bring the pleasure of freshly baked bread into a manageable homemade batch. These small loaves develop golden crusts, tender centers, and enough chew for sandwiches, soup, or a simple spread of butter. You only need basic ingredients, a little kneading, and time for two rises.
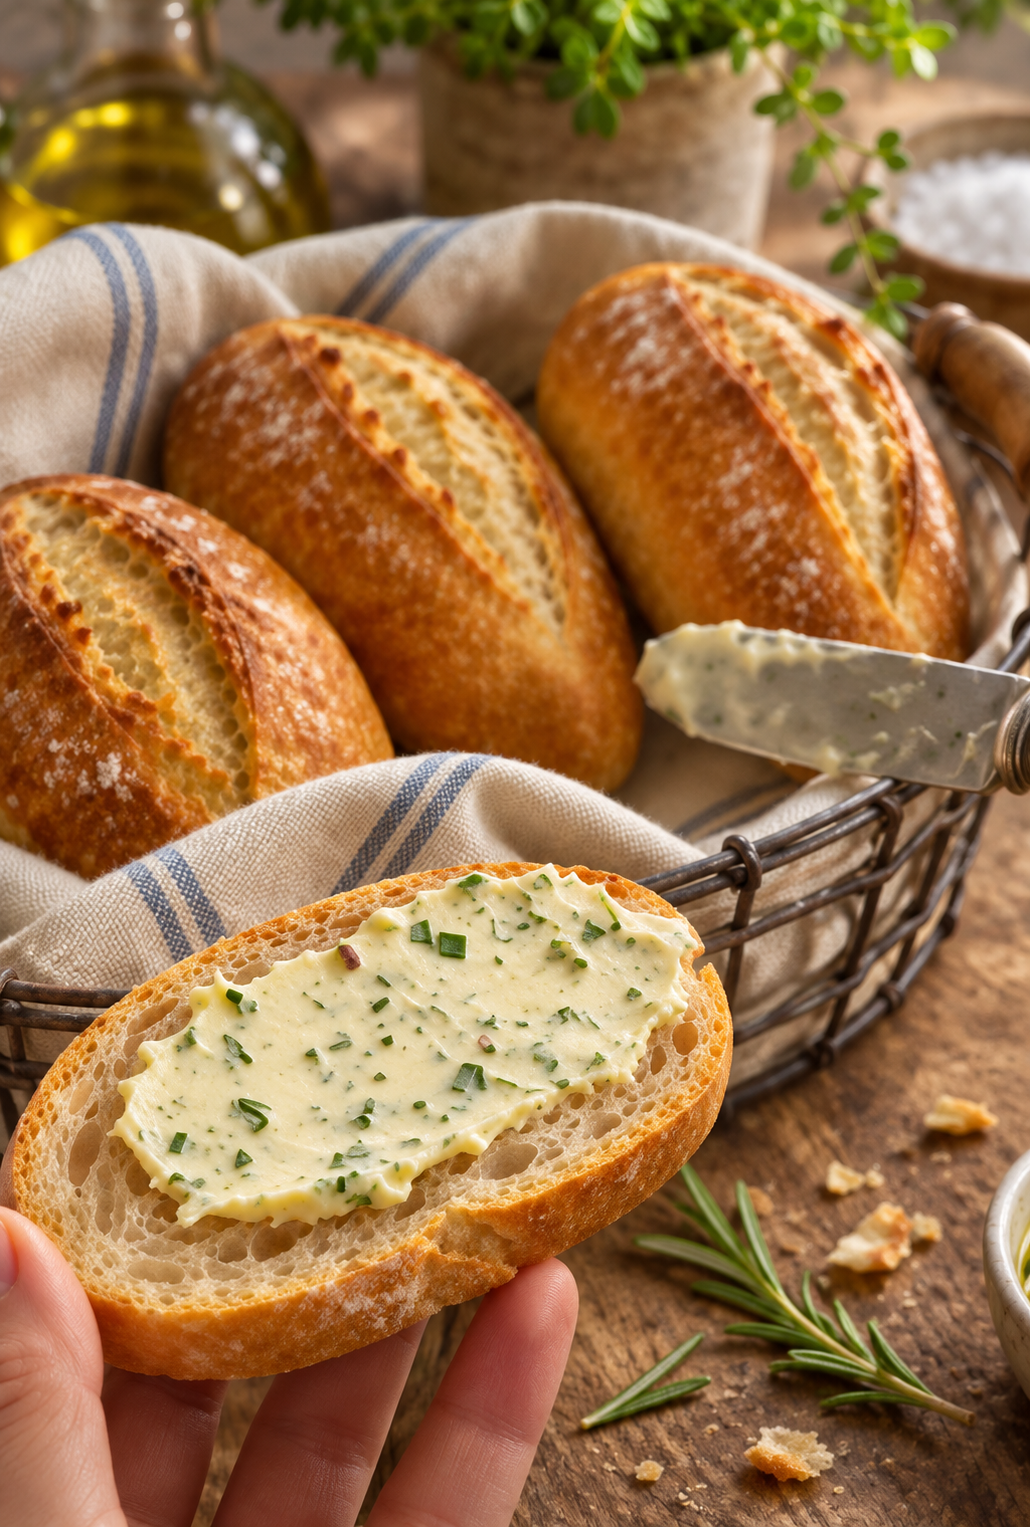
Picture a basket of warm bread at the center of a relaxed weekend lunch. Someone tears off an end, someone reaches for butter, and a few crumbs scatter across the table before the meal even starts. These little baguettes suit that kind of gathering beautifully. Their smaller size makes them easy to pass around, while their crisp crust gives every bite a satisfying crunch. Serve them with a pot of soup, fill them with chicken and vegetables, or enjoy a slice with herb butter like the serving suggestion in the photo.
This recipe makes four loaves, each about 8-10 inches long. Also, you can leave out the optional olive oil for a leaner dough or include it for a slightly softer bite.
One measurement deserves attention before you begin: 330 ml of water equals approximately 1⅓ US cups plus 1 tablespoon, rather than 1½ US cups. Use the metric measurements when possible to keep the dough consistent.
Mini French Baguettes
Equipment
- Large mixing bowl
- Kitchen scale and measuring spoons A scale gives the most consistent flour and water measurements.
- Bench scraper Optional, for handling and dividing the dough.
- Stand mixer with dough hook Optional; hand kneading also works.
- Baking sheet or baguette tray Use parchment rated for the baking temperature if lining a baking sheet.
- Bread lame or sharp blade For scoring the loaves.
- Sturdy metal baking pan For steam; do not use glass or ceramic.
- Wire cooling rack
Ingredients
- 450 g bread flour (approximately 3 1/2 cups), plus a little extra for dusting
- 330 ml lukewarm water (approximately 1 1/3 US cups plus 1 tablespoon)
- 2 teaspoons instant yeast
- 1 1/2 teaspoons fine salt
- 1 teaspoon granulated sugar
- 1 tablespoon olive oil, optional
- 1 cup hot water for the steam pan, not for the dough
Instructions
- Combine 330 ml lukewarm water, sugar, and instant yeast in a large bowl. Let stand for 5-10 minutes. Instant yeast may show only light bubbling.
- Add the bread flour and salt. Mix until a rough dough forms, then add the olive oil if using.
- Knead by hand for 8-10 minutes or with a stand mixer and dough hook for 5-7 minutes, until smoother and elastic. Keep the dough slightly tacky and add extra flour sparingly.
- Transfer the dough to a lightly greased bowl. Cover and let rise for 60-90 minutes, or until doubled.
- Gently turn the dough onto a lightly floured surface and divide into four equal portions. Cover and rest for 10 minutes if the dough resists shaping.
- Pat each portion into a rectangle. Fold the long edges inward, fold lengthwise, and seal the seam. Gently roll into an 8-10-inch loaf and slightly taper the ends.
- Place the loaves seam-side down on a suitable parchment-lined baking sheet or baguette tray. Cover loosely and let rise for 30-45 minutes, until puffy.
- Meanwhile, preheat the oven to 450°F (230°C) with a sturdy metal pan on a lower rack. Just before baking, make three or four shallow diagonal slashes in each loaf.
- Place the bread on the middle rack. Carefully pour approximately one cup of hot water into the metal pan, keeping hands and face clear of steam, and close the oven. Bake for 20-25 minutes, until deeply golden and crisp.
- Transfer the baguettes to a wire rack and cool for at least 20 minutes before slicing.
Notes
Nutrition
What Makes Mini French Baguettes Work
Simple Ingredients Build Texture
Bread flour gives these loaves their structure and pleasantly chewy texture. As you mix and knead the dough, its proteins develop into a stretchy network that holds the gas from the yeast. Consequently, the dough expands during rising and grows further in the oven.
Water hydrates the flour and keeps the crumb tender. This dough contains a generous amount of water, so expect some stickiness at the start. However, avoid adding large handfuls of flour to make it completely dry. Too much extra flour can produce heavy loaves with tight centers.
Meanwhile, instant yeast makes this a practical same-day bread. You can mix it directly with flour, although combining it with the water first also works. A small amount of sugar supports the recipe's mild flavor and browning.
Salt balances the bread's flavor and helps control fermentation. Measure it carefully, because different salt crystal sizes fill a teaspoon differently. Fine salt offers the most consistent results with the volume measurement here.
Small Loaves Offer Everyday Flexibility
Mini French Baguettes fit easily on a standard baking sheet, so you do not need a professional oven or a special bread pan. Their shorter length also makes shaping more approachable for beginners.
Furthermore, four separate loaves give you options after baking. Serve two with dinner and freeze the others for another day. Alternatively, slice each loaf lengthwise and prepare individual sandwiches.
These loaves follow a convenient home-style method. The sugar and optional olive oil create a slightly different dough from a strict flour-water-yeast-salt baguette, but they still deliver a crisp, satisfying result.
For the most pronounced crust, skip the oil and let the loaves brown deeply. For a slightly softer interior, include it. Either way, careful rising and a thoroughly heated oven matter more than complicated equipment.
Mixing, Kneading, and Rising the Dough
Develop Strength Without Adding Too Much Flour
Start with lukewarm water that feels comfortably warm, never hot. Stir in the yeast and sugar, then let the mixture stand briefly while you prepare the remaining ingredients. Instant yeast may show only modest bubbling, so do not expect a thick cap of foam.
Next, stir in the flour and salt. Add the olive oil if you plan to use it. The mixture will look rough and uneven at first, which is normal.
Knead by hand for about 8-10 minutes or use a stand mixer with a dough hook for approximately 5-7 minutes. However, judge the dough by its development as well as the clock. Look for a smoother surface and greater elasticity.
If the dough clings heavily to your hands, pause for five minutes. That short rest lets the flour absorb more water and often makes kneading easier. A bench scraper or lightly damp hands can also help you handle the sticky dough.
Finally, aim for supple dough that stretches before tearing. You do not need a perfectly dry ball.
Follow the Dough's Growth
Transfer the dough to a lightly greased bowl and cover it. Then let it rise until it roughly doubles in size, usually 60-90 minutes in a comfortably warm kitchen.
However, room temperature can shift that timing considerably. A cool kitchen slows the yeast, while a warmer spot speeds it up. Watch the dough instead of ending the rise simply because a timer rings.
Once the dough doubles, gently ease it onto a lightly floured surface. Avoid punching it forcefully, because some trapped gas will help create a lighter crumb.
Divide the dough into four equal portions. A scale makes this easy, although careful visual division also works. If the pieces resist shaping, cover them and rest them for 10 minutes.
That brief pause relaxes the dough. Consequently, you can stretch each portion with less pulling and fewer tears.
Shaping and Baking for a Crisp Crust
Shape Gently and Score with Purpose
Pat each dough portion into a small rectangle. Fold one long edge toward the center, then bring the opposite edge inward. Press gently along the seam to secure the folds.
Next, fold the dough lengthwise again and pinch the seam closed. Roll it gently from the center outward until it reaches about 8-10 inches. Apply slightly more pressure near the ends if you want tapered tips.
Place the loaves seam-side down on a parchment-lined baking sheet or baguette tray. Leave space between them so the sides can expand and brown.
Cover loosely and let them rise for 30-45 minutes, until they look noticeably puffy. Meanwhile, preheat the oven to 450°F (230°C).
Just before baking, make three or four shallow, slightly overlapping diagonal cuts along each loaf. Use a bread lame or a very sharp blade. Quick, confident cuts help the surface open as the bread expands.
Avoid deep cuts that flatten the dough. Also, score immediately before baking so the loaves keep their shape.
Use Steam and Allow Enough Browning
Steam helps the dough's surface stay flexible during the beginning of baking. As a result, the loaves can expand before the crust firms.
Place a sturdy metal pan on a lower oven rack during preheating. When you load the bread, carefully pour about one cup of hot water into that pan. Keep your face and hands away from the rising steam, and avoid splashing the oven door.
Use metal for this step; sudden temperature changes can damage glass or ceramic cookware. Also, choose parchment that tolerates the baking temperature, or use an appropriate baguette tray.
Bake the bread for 20-25 minutes, until the crust turns deeply golden. Rotate the sheet if your oven browns unevenly.
For a crisper finish, briefly open the oven near the end of baking to release remaining steam. Then finish baking until the loaves develop an even color.
Finally, move the bread to a wire rack. Let it cool for at least 20 minutes before slicing, so the interior can finish setting and release excess moisture.
Serving, Storing, and Troubleshooting
Enjoy Fresh Bread and Save Extra Loaves
Mini French Baguettes taste especially good on the day you bake them. Serve them with vegetable soup, chicken stew, a colorful salad, or a plate of cheese and fresh tomatoes.
For sandwiches, split a loaf lengthwise and add grilled chicken, tuna salad, roasted vegetables, or mozzarella. However, let the bread cool fully before adding fillings that could soften against warm bread.
The photo shows herb butter as a serving suggestion. You can mix softened butter with chopped parsley or chives and a little minced garlic, then spread it over cooled slices. Keep that topping separate from the basic bread recipe.
Store fully cooled loaves in a paper bag or loosely wrapped in a clean towel if you plan to eat them soon. A sealed plastic bag keeps the crumb softer but also softens the crust.
For longer storage, freeze the cooled loaves in airtight freezer bags for up to two months. Thaw, then warm them briefly in the oven to refresh the crust.
Solve Common Dough and Crust Problems
If your loaves feel dense, consider the flour first. Scooping flour directly with a measuring cup can pack in more than you need. Therefore, weigh the flour whenever possible, or spoon it into the cup and level the top.
Insufficient rising can also produce a tight crumb. Give the dough enough time to expand during both rises, especially in a cool room.
If the loaves spread outward, the dough may need stronger kneading, firmer shaping, or a shorter final rise. Next time, seal the seams carefully and watch the dough closely as it becomes puffy.
If the crust stays pale, allow more baking time and check that the oven heats fully before loading the bread. An inexpensive oven thermometer can help you identify temperature differences.
Finally, if the inside seems gummy, let the bread bake a little longer and cool before slicing. Cutting a hot loaf releases moisture before the crumb has time to set properly.
Ingredients
Makes 4 mini baguettes.
- 3½ cups bread flour (450 g), plus a little extra for dusting
- 330 ml lukewarm water, approximately 1⅓ US cups plus 1 tablespoon
- 2 teaspoons instant yeast
- 1½ teaspoons fine salt
- 1 teaspoon granulated sugar
- 1 tablespoon olive oil, optional
- Approximately 1 cup hot water, for the steam pan
Herb butter in the photo serves as an optional topping and does not form part of the bread dough.
Instructions
- Combine the yeast mixture. Stir the lukewarm water, sugar, and instant yeast in a large bowl. Let stand for 5-10 minutes; instant yeast may show only light bubbling.
- Mix the dough. Add the bread flour and salt. Stir until a rough dough forms, then add the optional olive oil.
- Knead until elastic. Knead by hand for 8-10 minutes or with a stand mixer and dough hook for 5-7 minutes. Keep the dough slightly tacky and use extra flour sparingly.
- Let the dough rise. Place it in a lightly greased bowl, cover, and let rise for 60-90 minutes, or until doubled.
- Divide and rest. Gently turn the dough onto a lightly floured surface. Divide into four equal portions. Cover and rest for 10 minutes if the dough resists shaping.
- Shape the baguettes. Pat each piece into a rectangle. Fold the long edges inward, fold lengthwise, and seal the seam. Gently roll into an 8-10-inch loaf with slightly tapered ends.
- Complete the second rise. Arrange the loaves seam-side down on a suitable parchment-lined baking sheet or baguette tray. Cover loosely and let rise for 30-45 minutes, until puffy.
- Preheat and score. Meanwhile, heat the oven to 450°F (230°C) with a sturdy metal pan on a lower rack. Just before baking, make three or four shallow diagonal slashes in each loaf.
- Bake with steam. Load the bread onto the middle rack. Carefully pour approximately one cup of hot water into the metal pan, keeping clear of the steam, and close the oven. Bake for 20-25 minutes, until deeply golden and crisp.
- Cool before slicing. Transfer the baguettes to a wire rack and cool for at least 20 minutes.
Timing: About 25 minutes preparation, 1½-2¼ hours rising, and 20-25 minutes baking, plus cooling. Allow an additional short shaping rest if needed.
Frequently Asked Questions
Can I use all-purpose flour instead of bread flour?
Yes. All-purpose flour can work, although it may produce a slightly less chewy crumb. Start with the same flour weight. If the dough feels especially loose, give it a short rest before deciding whether it needs a small additional dusting of flour.
Do I need to activate instant yeast?
No. Instant yeast can go directly into the flour. This recipe mixes it with water first for convenience, but a lack of dramatic foam does not automatically indicate a problem. Use fresh yeast and comfortably warm water.
Why does the water measurement differ from my original recipe?
The original recipe listed 1½ cups and 330 ml together, but those amounts differ. This version uses 330 ml, approximately 1⅓ US cups plus 1 tablespoon, to keep the dough consistent with the supplied metric quantity.
Can I make the dough ahead?
Yes. After kneading, cover the bowl and refrigerate the dough overnight, leaving room for expansion. The next day, let the dough warm enough to handle, then divide, shape, and complete the final rise. Cold dough may need more time.
How do I refresh a soft baguette crust?
Warm the loaf in a 350°F (175°C) oven for about 5-10 minutes. If the loaf feels dry, lightly dampen the exterior first. Then let it rest briefly before serving.
Conclusion
Mini French Baguettes turn basic pantry ingredients into four crisp, golden loaves with soft, chewy centers. Weigh the flour and water, give the dough time to rise, and shape each loaf gently for the best results.
Serve them fresh with dinner, spread a slice with herb butter, or freeze an extra loaf for another meal. With a hot oven and a little patience, this small batch brings homemade bread to the table without complicated equipment.
Leave a Reply