
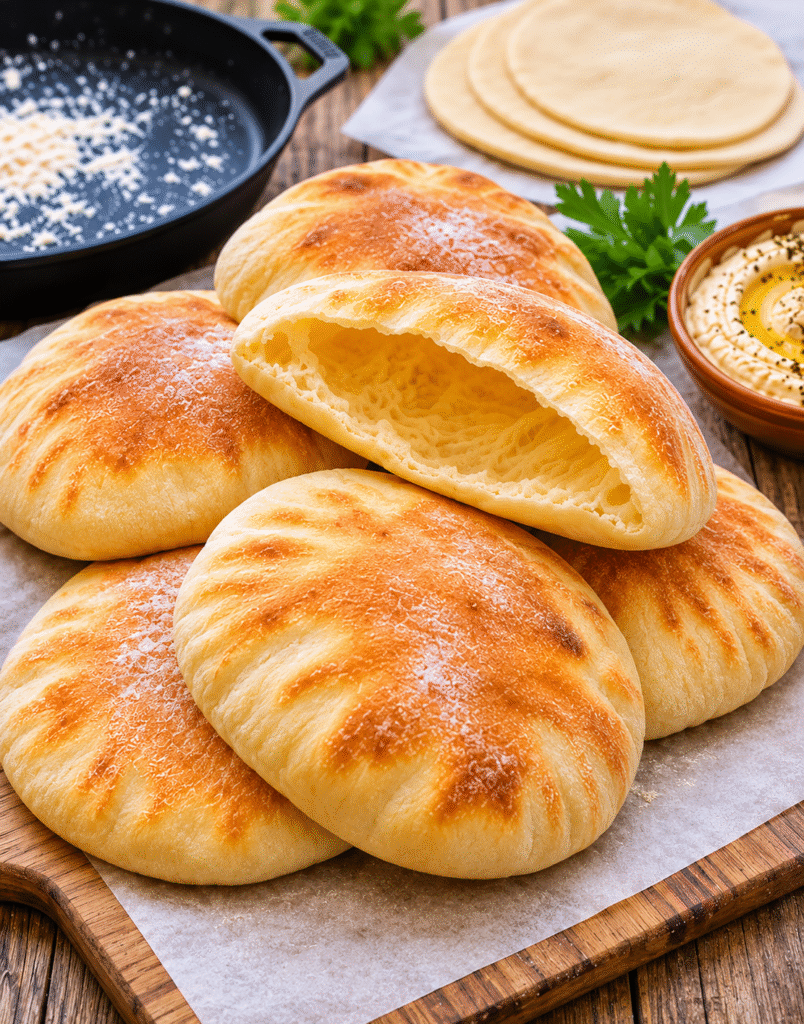
There’s something special about freshly made pita bread. Warm, soft, slightly chewy, and beautifully puffed, homemade pita has a wonderful texture that’s difficult to resist. This Soft & Fluffy Pocket Pita Bread recipe turns a handful of everyday pantry ingredients into delicious homemade flatbreads with a hollow center that’s perfect for filling.
Unlike store-bought pita, homemade pita comes straight from the skillet while still warm. The outside develops delicate golden-brown spots, while the inside remains soft and tender. When cooked correctly, the dough puffs up and separates into two thin layers, creating the classic pocket that makes pita bread so useful.
The best part is that you don’t need a traditional oven or special bread-making equipment. A mixing bowl, rolling pin, and hot skillet are enough to prepare these homemade pitas. The yeast dough is simple to work with, and once it has risen, the individual portions cook in just a few minutes.
Use them for gyros, falafel sandwiches, chicken wraps, fresh vegetable pockets, or simply serve them alongside hummus and your favorite dips. They are also delicious brushed with a little olive oil and served warm.
Whether you’re making bread for a family dinner, preparing homemade sandwiches, or simply enjoying the satisfaction of baking from scratch, this easy pita recipe is one you’ll want to make again.
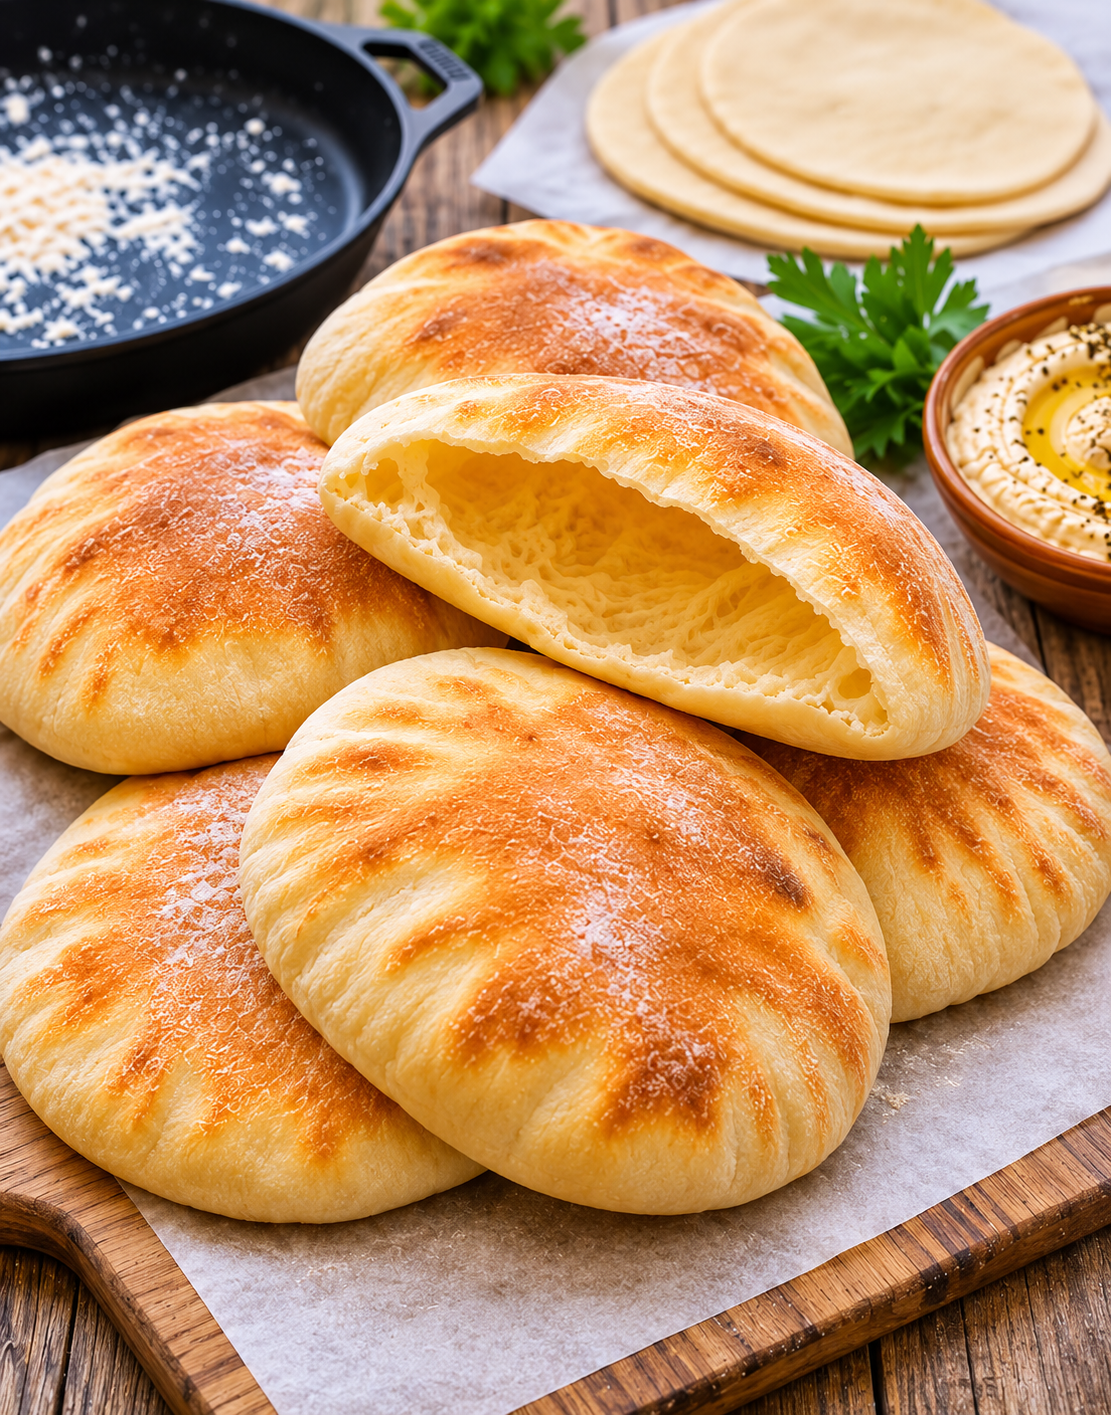
Soft & Fluffy Pocket Pita Bread
Equipment
- Large mixing bowl
- Measuring cups and spoons
- Kitchen scale For accurate flour measurements
- Rolling Pin
- Cast-iron skillet or heavy frying pan For cooking pita on the stovetop
- Clean kitchen towel For covering cooked pita
Ingredients
- 3 cups all-purpose flour (375 g)
- 1 cup warm water (240 ml), 105-110°F
- 2 1/2 teaspoons instant yeast (7 g)
- 1 tablespoon sugar (12 g)
- 1 teaspoon salt (6 g)
- 2 tablespoons olive oil (30 ml)
Instructions
- Combine warm water, instant yeast, and sugar in a large mixing bowl. Allow to stand for 5-10 minutes.
- Add flour, salt, and olive oil. Mix until a rough dough forms.
- Knead for 8-10 minutes until the dough becomes smooth, soft, and elastic.
- Place dough in a lightly oiled bowl. Cover and let rise for 60-90 minutes or until doubled in size.
- Gently deflate the dough and divide into eight equal portions. Shape into balls, cover, and rest for 10 minutes.
- Roll each ball into a 5-6-inch round approximately 1/4 inch thick. Keep the thickness even.
- Heat a dry cast-iron skillet or heavy frying pan over medium-high heat until very hot.
- Cook each pita for 1-2 minutes until bubbles appear. Flip and cook the other side for another 1-2 minutes until puffed and lightly golden. Flip briefly again if needed.
- Transfer each cooked pita to a clean kitchen towel and cover to retain softness. Repeat with remaining dough and serve warm.
Notes
Nutrition
Why You’ll Love This Homemade Pita Bread
Soft, Fluffy, and Perfectly Chewy
The texture is what makes homemade pita so enjoyable. A properly prepared dough produces bread that is soft enough to fold without cracking but sturdy enough to hold your favorite fillings.
The combination of flour, water, yeast, and olive oil creates a flexible dough that becomes smooth and elastic after kneading. As the yeast works, it produces gas that expands the dough and creates the structure needed for a light, airy bread.
When a rolled pita meets a sufficiently hot skillet, steam develops inside the dough. This causes the two sides to separate and creates the familiar hollow pocket.
The finished bread should have a soft interior and lightly browned spots on the outside. It should also remain flexible after cooling, especially when stored under a clean kitchen towel.
Simple Ingredients and No Oven Required
Another reason to love this recipe is its simplicity. You don’t need complicated ingredients, expensive equipment, or a baking stone.
All-purpose flour provides the structure, warm water activates the yeast, and a little sugar helps support fermentation. Salt improves the flavor, while olive oil contributes softness and makes the dough easier to handle.
Cooking the pitas on the stovetop is particularly convenient. A heavy frying pan or cast-iron skillet retains heat well and allows each bread to cook quickly.
Because the pitas cook individually, you can adjust the heat as needed and watch each one puff up. It’s a satisfying process, especially when the first pita forms a beautiful pocket.
Choosing the Right Ingredients for Soft Pita Bread
Flour, Warm Water, and Yeast
All-purpose flour is an excellent choice for homemade pita because it produces a balanced texture that is soft yet strong enough to hold fillings. For this recipe, use approximately 3 cups of flour, weighing about 375 grams depending on the brand and measuring method.
Warm water is essential for activating the yeast. Aim for approximately 105-110°F (40-43°C). Water that is too cold can slow fermentation, while excessively hot water can damage the yeast.
Instant yeast is convenient because it can be mixed directly with the other dry ingredients. Active dry yeast also works, although blooming it in warm water first is a useful precaution.
Sugar is included in a small quantity to provide a little food for the yeast and add balance to the dough. Salt enhances the flavor and helps regulate fermentation.
Olive Oil and Optional Ingredients
Olive oil adds softness and improves the dough’s handling. It helps prevent the pita from becoming dry and contributes a subtle flavor.
Two tablespoons are sufficient for this recipe. You can use extra virgin olive oil for a more noticeable olive flavor or regular olive oil for a milder result.
If you want particularly soft pita bread, you can experiment with adding one tablespoon of plain yogurt. This is optional and may slightly change the dough’s hydration and texture, so adjust the flour or water gradually if needed.
Avoid adding too much flour during kneading. A slightly soft dough generally produces a more tender finished pita. Excessive flour can make the bread dense and interfere with the puffing process.
How to Make Soft and Fluffy Pocket Pita Bread
Step 1: Prepare the Dough
In a large mixing bowl, combine the warm water, instant yeast, and sugar. If using instant yeast, you can mix it directly with the flour instead, but allowing it to hydrate briefly in the water is also convenient.
Add the all-purpose flour, salt, and olive oil. Mix with a wooden spoon or spatula until a rough dough forms.
Transfer the dough to a lightly floured surface and begin kneading. Work the dough for approximately 8-10 minutes until it becomes smooth, elastic, and slightly tacky.
If the dough sticks excessively to your hands, add a small amount of flour. Avoid adding too much because a dry dough can produce tougher pita bread.
Step 2: Allow the Dough to Rise
Lightly oil a clean mixing bowl and place the dough inside. Turn it once so the surface is lightly coated.
Cover the bowl with a clean kitchen towel or plastic wrap. Leave it in a warm, draft-free location for approximately 60-90 minutes, or until doubled in size.
The rising time depends on room temperature and yeast activity. A warmer kitchen usually allows the dough to rise more quickly.
The dough should look visibly expanded and feel airy when gently touched. If it hasn’t doubled after an hour, give it more time rather than rushing the process.
This resting period is important because it develops the dough’s structure and helps create a soft, flexible pita.
Step 3: Divide and Shape the Dough
Once the dough has risen, gently press it down to release some of the accumulated air.
Transfer it to a lightly floured work surface and divide it into eight equal portions. Shape each portion into a smooth ball by folding the edges underneath and gently rolling it against the counter.
Cover the dough balls with a clean towel and let them rest for approximately ten minutes.
This short resting period relaxes the gluten, making the dough easier to roll without shrinking back.
Step 4: Roll the Pita Rounds
Take one dough ball and place it on a lightly floured surface. Use a rolling pin to flatten it into a round approximately 5-6 inches across and about 1/4 inch thick.
Try to keep the thickness as even as possible. Uneven dough may puff in some places but remain flat in others.
Avoid pressing excessively hard or rolling the dough too thin. The goal is to create a consistent round that can expand evenly when it meets the hot skillet.
Keep the remaining dough balls covered while working so they don’t dry out.
Step 5: Cook the Pita on a Hot Skillet
Heat a heavy skillet or cast-iron pan over medium-high heat. Allow it to become thoroughly hot before adding the first pita.
Place one dough round directly onto the dry skillet. Cook for approximately 1-2 minutes until small bubbles begin appearing and the underside develops light golden spots.
Flip the bread and cook the second side for another 1-2 minutes. Flip again briefly if necessary until it puffs.
You may notice the bread expanding dramatically as steam separates its two layers. This is the moment when the pocket forms.
If the pita doesn’t puff immediately, don’t panic. Small adjustments to skillet temperature, dough thickness, and rolling consistency often make a difference.
Transfer each finished pita to a clean kitchen towel and cover it to retain warmth and moisture.
Repeat with the remaining dough portions.
Step 6: Keep the Pitas Soft and Serve
Once all the pita breads are cooked, stack them under a clean towel. The trapped warmth helps keep the bread soft and flexible.
Serve them warm with hummus, falafel, grilled chicken, gyros, cucumber, tomatoes, or fresh herbs.
To create stuffed pita sandwiches, allow the bread to cool slightly and gently cut along one edge to reveal the pocket. Fill with your favorite ingredients and enjoy.
Tips for Perfectly Puffed Pita Bread
Getting a beautiful pocket is easier when you pay attention to a few details.
Use a properly heated skillet. The pan must be hot enough to create steam inside the dough. A skillet that is too cool may produce flat, dry bread.
Roll the dough evenly. Aim for consistent thickness across each round. Thick spots may remain doughy while thin areas become crisp too quickly.
Don’t add excessive flour. Too much flour can make the dough stiff and reduce its ability to puff.
Allow the dough to rest. Both the initial rise and the short rest after dividing are important for a soft texture.
Keep cooked pita covered. Exposure to air can dry the bread quickly. Stacking it under a towel helps preserve softness.
Adjust the heat between batches. If the skillet becomes excessively hot, reduce the heat slightly to prevent the exterior from browning before the inside cooks.
Delicious Ways to Serve Homemade Pita
These pitas are incredibly versatile and can be enjoyed throughout the day.
For breakfast, fill them with scrambled eggs, cheese, and fresh vegetables. For lunch, create chicken pita sandwiches with lettuce, tomatoes, cucumber, and a creamy dressing.
At dinner, serve them alongside grilled meats, falafel, roasted vegetables, or Mediterranean-style salads.
They are also wonderful with dips. Hummus, baba ganoush, tzatziki, and whipped feta all complement the soft bread beautifully.
For a simple snack, brush warm pita with olive oil and sprinkle with za’atar or sesame seeds. You can also cut them into wedges and toast them lightly to make homemade pita chips.
Make-Ahead, Storage, and Freezing Instructions
Homemade pita is at its best shortly after cooking, but it can easily be stored for later.
Allow the bread to cool completely before placing it in an airtight storage bag.
- Room temperature: Up to 2 days.
- Refrigerator: Up to 5 days.
- Freezer: Up to 3 months.
For freezing, place parchment paper between the individual pitas so they don’t stick together. Seal them in a freezer-safe bag and remove as much excess air as possible.
To reheat refrigerated or thawed pita, place it in a warm dry skillet for approximately 15-30 seconds per side. You can also wrap several breads in foil and warm them in an oven preheated to 350°F (175°C).
Avoid overheating because this can dry out the bread and make it less flexible.
Ingredients
- 3 cups all-purpose flour (approximately 375 g)
- 1 cup warm water (240 ml), approximately 105-110°F
- 2½ teaspoons instant yeast (7 g)
- 1 tablespoon sugar (12 g)
- 1 teaspoon salt (6 g)
- 2 tablespoons olive oil (30 ml)
Instructions
- Combine warm water, instant yeast, and sugar in a large mixing bowl.
- Add flour, salt, and olive oil. Mix until a rough dough forms.
- Knead for 8-10 minutes until smooth and elastic.
- Place the dough in a lightly oiled bowl, cover, and let rise for 60-90 minutes or until doubled.
- Gently deflate the dough and divide into eight equal portions.
- Shape into balls, cover, and rest for ten minutes.
- Roll each ball into a 5-6-inch round approximately 1/4 inch thick.
- Heat a dry cast-iron skillet over medium-high heat.
- Cook each pita for approximately 1-2 minutes per side until puffed and lightly golden. Flip briefly again if necessary.
- Transfer cooked pita to a clean kitchen towel and cover to keep soft.
- Repeat with the remaining dough.
- Serve warm with your favorite fillings and dips.
Frequently Asked Questions
1. Why didn’t my pita bread puff up?
The skillet may not have been hot enough, or the dough may have been rolled unevenly. Make sure the pan is thoroughly preheated and roll each round to a consistent thickness. Also avoid adding too much flour during kneading.
2. Can I use active dry yeast instead of instant yeast?
Yes. Use the same approximate quantity. Dissolve the active dry yeast in the warm water with the sugar and allow it to stand for about 5-10 minutes until foamy before adding the flour and remaining ingredients.
3. Can I make pita dough ahead of time?
Yes. Prepare the dough, place it in a covered bowl, and refrigerate it after the initial mixing and kneading. Allow it to come closer to room temperature before dividing and rolling. The chilled dough may need additional resting time.
4. Can I freeze homemade pita bread?
Absolutely. Cool the pitas completely, separate them with parchment paper, and place them in a sealed freezer bag. Freeze for up to three months and reheat after thawing.
5. What can I serve with pita bread?
Pita is delicious with hummus, falafel, gyros, grilled chicken, kebabs, fresh vegetables, salads, and tzatziki. It can also be filled with scrambled eggs or used as a base for quick mini pizzas.
Conclusion
Soft & Fluffy Pocket Pita Bread is a simple homemade recipe that delivers warm, tender, chewy bread with the classic hollow center everyone loves. Made with everyday ingredients and cooked on a hot skillet, these pitas are easy to prepare and wonderfully versatile.
The secret is giving the dough enough time to rise, rolling each round evenly, and cooking it on a properly heated skillet. Once you see the first pita puff into a beautiful pocket, you’ll understand why homemade pita is so rewarding.
Serve it warm with hummus, grilled chicken, falafel, fresh vegetables, or your favorite sandwich fillings. Make a batch for the family, freeze a few for later, and enjoy fresh homemade pita whenever you like.

Leave a Reply