
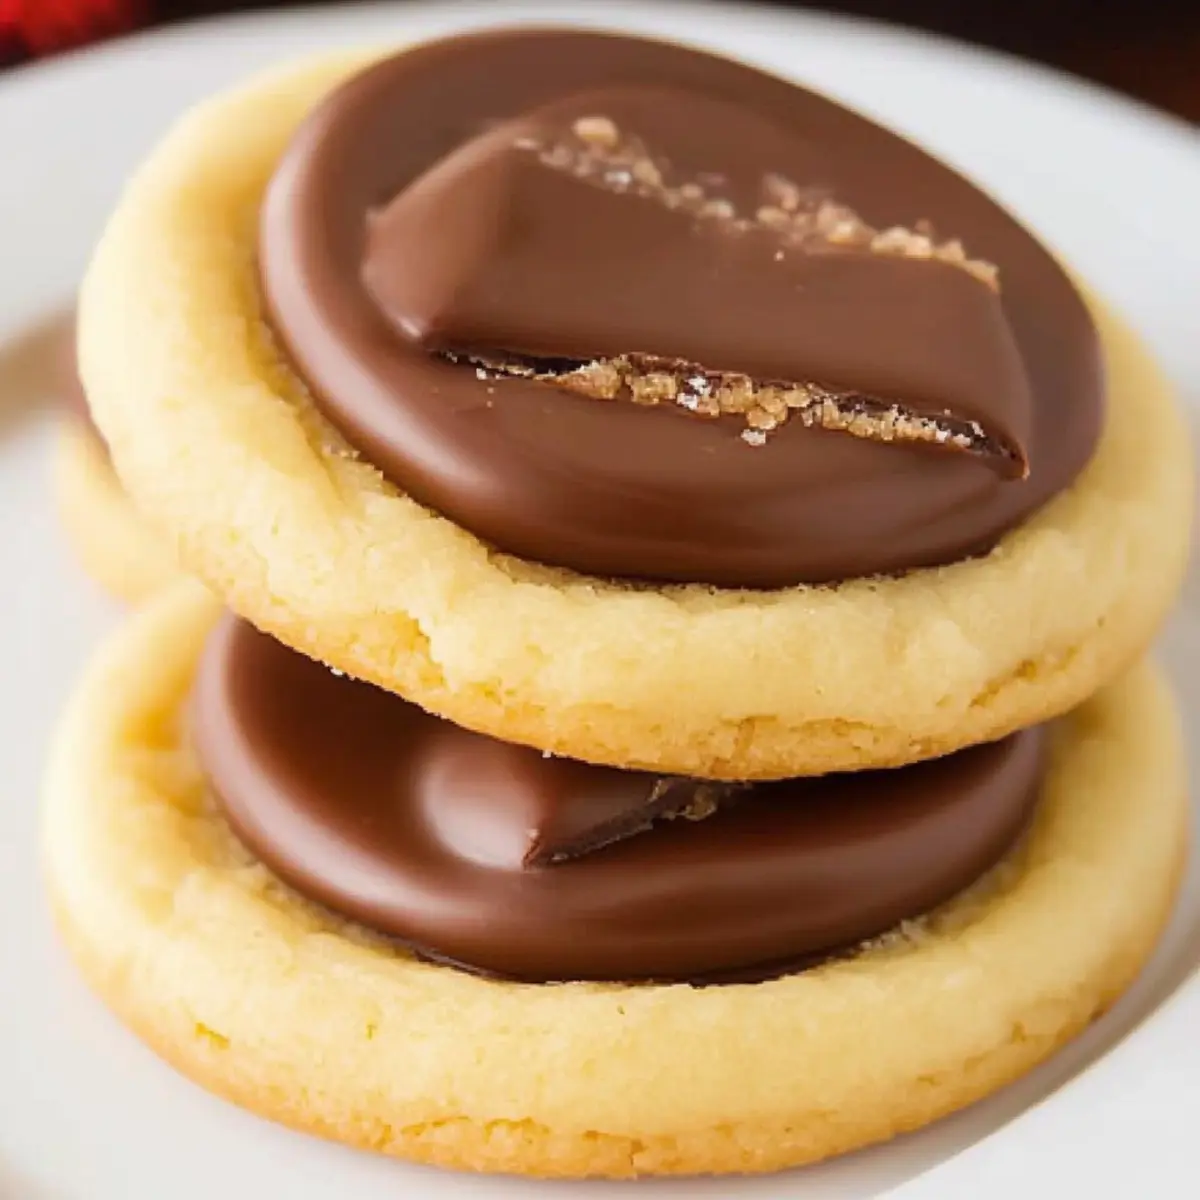
As the holiday season approaches, the kitchen buzzes with an air of excitement and delicious aromas. One afternoon, inspired by the festive spirit, I decided to recreate the beloved flavors of Twix bars in cookie form. The result? These Decadent Twix Cookies that promise to elevate your dessert table and bring smiles to faces!
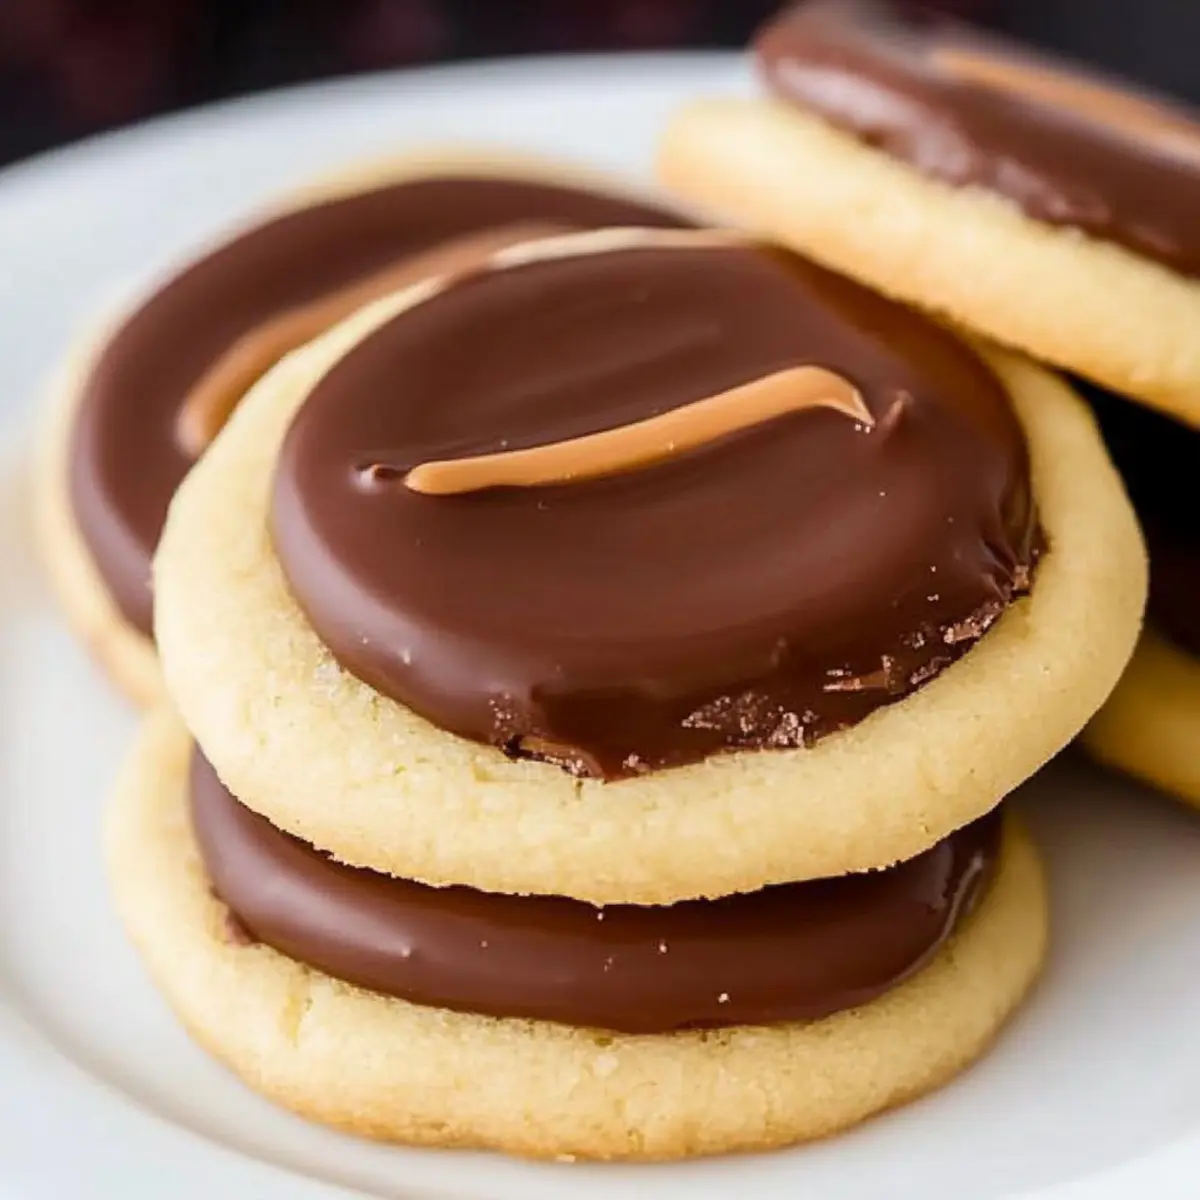
Imagine buttery shortbread crumbling softly beneath a layer of chewy caramel, all dressed in a luscious coat of rich chocolate. These treats are not only a visual delight but also a sweet, chewy remedy for holiday cravings. Perfect for cookie exchanges or cozy family gatherings, they are surprisingly simple to whip up, ensuring that you don’t have to spend hours in the kitchen. So, gather your loved ones and prepare to indulge in an irresistible cookie that captures the festive spirit of Christmas in every bite!
Why are Twix Cookies for Christmas a must-try?
Indulgence at Its Finest: These Twix Cookies for Christmas bring a rich, festive flavor to your holiday baking.
Easy to Make: You don’t need to be a baking expert to create these stunning treats.
Showstopper: Their visual appeal will impress anyone at your holiday gatherings.
Flavor Combination: The classic trio of buttery shortbread, gooey caramel, and smooth chocolate is simply irresistible.
Crowd-Pleasing Delight: Perfect for cookie exchanges, they are sure to earn you compliments and requests for the recipe!
Heartfelt Sharing: Bake with your loved ones to create sweet memories this holiday season.
Twix Cookies Ingredients
• Discover all the essentials for perfect Twix Cookies for Christmas!
For the Cookie Base
- Butter – Adds richness and creates a tender structure; ensure it’s softened to room temperature for easy blending.
- Powdered Sugar – Sweetens the dough and contributes to that characteristic sandy texture of shortbread.
- Vanilla Extract – Infuses warmth and depth; opt for pure vanilla for truly exceptional flavor.
- All-Purpose Flour – Forms the backbone of the cookie; remember, do not over-mix to keep it tender.
- Salt – Balances sweetness and enhances the flavor profile of the cookies.
For the Caramel Layer
- Caramel Bits – Deliver that signature chewy texture, reminiscent of Twix bars; using unwrapped bits saves time.
- Heavy Cream – Blends beautifully with caramel bits to create a smooth, pourable topping.
For the Chocolate Topping
- Milk Chocolate Chips – Provide a sweet and creamy finish; feel free to swap for semi-sweet or dark chocolate for a richer taste.
- Coconut Oil or Vegetable Shortening – Keeps melted chocolate smooth and glossy; ideal for that perfect final touch.
With these ingredients on hand, you’re just a few steps away from deliciously festive Twix Cookies for Christmas that will wow your friends and family!
How to Make Twix Cookies
-
Preheat: Start by preheating your oven to 350°F (175°C). Line a baking sheet with parchment paper to ensure your Twix Cookies bake evenly without sticking.
-
Cream Together: In a mixing bowl, cream the softened butter and powdered sugar until smooth and fluffy. This creates a light, airy texture that’s essential for your cookie dough.
-
Add Flavor: Mix in the vanilla extract, then gradually add the all-purpose flour and salt. Blend until just combined to keep the dough tender and crumbly.
-
Roll and Cut: Lightly flour your surface, then roll the dough to about 1/4-inch thickness. Use cookie cutters to cut out rounds, then transfer them to the prepared baking sheet.
-
Bake: Place in the oven and bake for 10-12 minutes, or until the edges are lightly golden. Let them cool completely on a wire rack.
-
Prepare Caramel: In a microwave-safe bowl, combine the caramel bits and heavy cream. Heat in 20-second intervals, stirring until smooth and well blended.
-
Layer Caramel: Once the cookies are completely cool, spoon the caramel over each one. Allow it to set slightly at room temperature.
-
Melt Chocolate: In a separate bowl, melt the milk chocolate chips and coconut oil until smooth. Stir well to combine, ensuring a glossy finish.
-
Top with Chocolate: Drizzle or spread the melted chocolate over the caramel layer on each cookie. Let them cool completely to set.
Optional: Sprinkle a pinch of sea salt over the chocolate layer for an added sweet and salty contrast.
Exact quantities are listed in the recipe card below.

Make Ahead Options
These Decadent Twix Cookies for Christmas are perfect for busy home cooks looking to save time! You can prepare the cookie dough up to 24 hours in advance by wrapping it tightly in plastic wrap and refrigerating it. When you’re ready to bake, simply roll out the chilled dough and cut into rounds before baking as instructed. Additionally, the cookies can be baked without toppings and stored in an airtight container at room temperature for up to 3 days. For the caramel and chocolate layers, you can prepare them ahead, but add them just before serving for the best texture and to avoid any stickiness. This way, you’ll have your holiday treats ready with minimal effort when it’s time for festivities!
Twix Cookies for Christmas Variations
Feel free to explore these delightful twists and make the recipe your own!
- Almond Flavor: Substitute almond extract for vanilla for a nutty nudge that adds warmth and richness.
- Dark Chocolate Delight: Swap milk chocolate chips for dark chocolate for a sophisticated, less sweet finish.
- Salted Caramel Twist: Sprinkle sea salt over the chocolate layer to enhance the sweet and salty contrast, elevating the flavor.
- Coconut Infusion: Use unsweetened shredded coconut on top of the caramel before adding chocolate for an exotic flair. It brings a chewy, tropical element to every bite.
- Nutty Crunch: Fold in chopped nuts like pecans or almonds into the cookie dough for a delightful crunch that complements the soft layers.
- Spicy Kick: Add a pinch of cayenne pepper or cinnamon to your chocolate topping for a surprising kick that warms the palate. This will create an intriguing contrast with the sweetness.
- Mini Version: Make mini cookie bites by rolling smaller balls of dough and adjusting the baking time. Perfect for party platters or snacking!
- Fruit Fusion: Top your cookies with fresh raspberries or a drizzle of raspberry sauce after the chocolate sets for a fruity twist that brightens the whole experience.
Expert Tips for Twix Cookies
• Dough Consistency: Ensure your dough is soft but not sticky; if it’s too sticky, sprinkle a bit of flour to balance it out.
• Cooling Time: Allow cookies to cool completely before adding caramel. This prevents melting and creates a beautifully layered cookie.
• Microwave Caution: When melting caramel bits, heat in short intervals. Overheating can cause the caramel to seize, ruining your Twix Cookies.
• Chocolate Melting: Use a double boiler or microwave to melt chocolate gently. This prevents burning and ensures a smooth topping.
• Storage Tips: Keep your Twix Cookies in an airtight container to maintain freshness. For longer storage, freeze them without toppings and add later.
Storage Tips for Twix Cookies
Room Temperature: Store in an airtight container at room temperature for up to 5 days to maintain their delightful texture and flavor.
Fridge: If you prefer, these cookies can be refrigerated for up to 2 weeks, but allow them to come to room temperature before serving for the best taste.
Freezer: Freeze the cookies without the caramel and chocolate toppings for up to 3 months. Once thawed, add toppings to keep them fresh and visually appealing.
Reheating: To enjoy warm cookies, place them in the microwave for about 10-15 seconds. This enhances the chewy caramel and smooth chocolate layers, making these Twix Cookies even more indulgent!
What to Serve with Twix Cookies?
Imagine a cozy gathering or a festive party where these delightful cookies shine on the dessert table, inviting everyone to indulge in their luscious flavors.
-
Milk: The classic pairing! A cold glass of milk perfectly balances the richness of the cookies, enhancing every bite.
-
Coffee: The warmth and bitterness of freshly brewed coffee contrasts beautifully with the sweet chocolate, making every taste truly satisfying.
-
Vanilla Ice Cream: Serve a scoop alongside—its creamy texture complements the chewy caramel in these Twix Cookies, creating a delightful experience.
-
Fruit Salad: A refreshing mix of seasonal fruits adds a bright, tangy note, providing a lovely contrast to the cookie’s sweetness.
-
Chocolate Mint Smoothie: Blend chocolate with mint and a touch of cream for a dessert drink that harmonizes with the cookie’s flavors.
-
Cheesecake Bites: Mini cheesecake treats pair wonderfully, offering a creamy, tangy counterpoint to the cookie’s sweetness.
-
Sparkling Water: A bubbly drink helps cleanse the palate and complements the rich textures of the cookies without overpowering their sweetness.
-
Homemade Hot Chocolate: For those cold winter nights, a warm cup of hot chocolate makes a comforting match, creating a chocolate lover’s dream.
By serving any of these delightful accompaniments, you will elevate the experience of enjoying these Twix Cookies, making your holiday gatherings even more memorable.

Twix Cookies for Christmas Recipe FAQs
How do I choose the best caramel bits for my Twix Cookies?
Absolutely! When selecting caramel bits for your Twix Cookies, look for brands that are labeled “soft” or “creamy.” Avoid any that appear overly hard or have dark spots, as these may not melt smoothly. Unwrapped caramel bits save prep time, allowing you to jump right into the fun of baking!
How should I store my Twix Cookies after baking?
You can store your Twix Cookies at room temperature in an airtight container for up to 5 days, ensuring they maintain their delightful texture. If you prefer, refrigerating them extends their freshness to 2 weeks, but remember to allow them to come to room temperature before enjoying for the best flavor and texture!
Can I freeze Twix Cookies, and how do I do it?
Absolutely! To freeze your Twix Cookies, it’s best to freeze them without the caramel and chocolate toppings. Arrange the cooled cookies in a single layer on a baking sheet and freeze until solid, about 1-2 hours. Then, transfer them to an airtight container or freezer bag and store for up to 3 months. When you’re ready to enjoy them, simply thaw at room temperature and add your toppings!
What if my cookie dough is too sticky?
Very! If your cookie dough is stickier than desired, sprinkle in a little extra flour, about a tablespoon at a time, until it reaches a manageable consistency. Dough can become sticky for various reasons, including humidity. I often find that chilling the dough for about 30 minutes in the fridge can help with handling as well.
Are there any dietary considerations I should keep in mind with Twix Cookies?
Of course! If you’re baking for someone with food allergies, be mindful of the ingredients. Common allergens include gluten from the all-purpose flour, dairy from the butter and cream, and nuts if using flavored extracts. For a nut-free version of the cookies, simply omit any nut extracts and ensure your chocolate is nut-free. You can also make substitutions for vegan needs by using plant-based butter and dairy-free chocolate options!
How long does it take for the caramel to set on the cookies?
To achieve the perfect caramel layer on your Twix Cookies, allow the spooned caramel to set at room temperature for about 30-60 minutes. This time ensures the caramel is perfectly chewy and won’t spill when you add the chocolate layer. If you’re in a hurry, you can place them in the fridge for about 15-20 minutes to hasten the setting process!
Irresistibly Indulgent Twix Cookies for Christmas Bliss
Equipment
- Mixing Bowl
- baking sheet
- Parchment Paper
- microwave-safe bowl
Ingredients
For the Cookie Base
- 1 cup Butter softened to room temperature
- 1/2 cup Powdered Sugar
- 1 teaspoon Vanilla Extract pure preferred
- 2 cups All-Purpose Flour do not over-mix
- 1/4 teaspoon Salt
For the Caramel Layer
- 1 cup Caramel Bits unwrapped
- 1/4 cup Heavy Cream
For the Chocolate Topping
- 1 cup Milk Chocolate Chips can substitute semi-sweet or dark
- 2 tablespoons Coconut Oil or Vegetable Shortening for smoothness
Instructions
How to Make Twix Cookies
- Preheat your oven to 350°F (175°C) and line a baking sheet with parchment paper.
- Cream the softened butter and powdered sugar together until smooth and fluffy.
- Mix in the vanilla extract, then gradually add the all-purpose flour and salt.
- Roll the dough to about 1/4-inch thickness and cut out rounds.
- Bake for 10-12 minutes until the edges are lightly golden.
- Combine caramel bits and heavy cream in a microwave-safe bowl, heating until smooth.
- Spoon the caramel over each cooled cookie and let set.
- Melt the milk chocolate chips and coconut oil until smooth, then drizzle over the caramel.
- Allow the chocolate to cool completely to set.

Leave a Reply