Mini Cuppa Cake
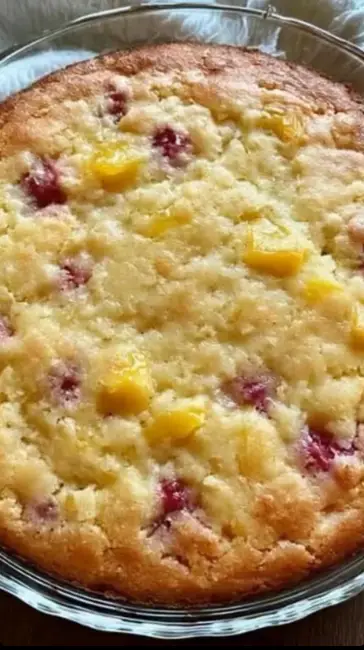
Mini Cuppa Cake is a wonderfully simple and sweet dessert that combines a buttery, golden base with the juicy goodness of fruit cocktail. This one-pan recipe is ideal for beginners and perfect for when you want a quick, comforting dessert. Its soft texture and the warm, fruity topping make it irresistible, especially when served with vanilla ice cream or whipped cream. Whether it’s a family treat or a last-minute guest dessert, Mini Cuppa Cake is sure to delight.
Here’s a quick story to set the scene: Growing up, I always loved the cozy smell of baking wafting through the kitchen. One rainy afternoon, I decided to try a simple fruit cake recipe I found in an old cookbook. With only a few ingredients on hand, I poured butter into a pan, layered flour and sugar, and topped it with canned fruit. The cake baked to perfection, golden and bubbling, and paired with a scoop of vanilla ice cream, it instantly became a family favorite. That memory is why this Mini Cuppa Cake has a special place in my heart.
Equipment
- 9-inch pie dish or cake pan
- Mixing Bowl
- spoon or spatula
Ingredients
- 0.25 cup unsalted butter, divided
- 1 cup self-rising flour
- 1 cup granulated sugar
- 1 can (15 oz) fruit cocktail in juice
- Vanilla ice cream or whipped cream, for serving
Instructions
- Preheat oven to 350°F (175°C). Grease a 9-inch pie dish or cake pan with part of the butter.
- Melt remaining butter and pour it evenly into the prepared pan.
- In a bowl, mix self-rising flour and sugar.
- Spread the dry mixture evenly over the melted butter.
- Spoon the fruit cocktail with its juice evenly over the top. Do not stir.
- Bake for 45–50 minutes, until golden and bubbly.
- Serve warm with vanilla ice cream or whipped cream.
Notes
Nutrition
Ingredients
- ¼ cup unsalted butter, divided
- 1 cup self-rising flour
- 1 cup granulated sugar
- 1 can (15 oz) fruit cocktail in juice (do not drain)
- Vanilla ice cream or whipped cream, for serving
Instructions
- Preheat oven to 350°F (175°C). Grease a 9-inch pie dish or cake pan with part of the butter.
- Melt remaining butter and pour it evenly into the prepared pan.
- In a bowl, mix self-rising flour and sugar.
- Spread the dry mixture evenly over the melted butter.
- Spoon the fruit cocktail with its juice evenly over the top. Do not stir.
- Bake for 45–50 minutes, until golden and bubbly.
- Serve warm with vanilla ice cream or whipped cream.
Baking the Perfect Mini Cuppa Cake
Preparing the Pan and Butter
Greasing your pan properly ensures the cake doesn’t stick. Using half of the butter to grease the pan and melting the other half creates a rich, moist base. Pouring melted butter before adding the dry mixture forms a thin, golden crust that crisps while baking.
Layering the Ingredients
Mixing flour and sugar separately allows even distribution over the butter. Carefully spreading this mixture without disturbing the butter layer is key. Then, topping with the fruit cocktail in its juice provides moisture and natural sweetness. Avoid stirring to create that beautiful, distinct layer structure.
Baking Techniques for Success
Oven Temperature and Timing
A preheated oven ensures even cooking. Bake at 350°F (175°C) for 45–50 minutes. Check for golden edges and bubbling fruit to confirm it’s done. Avoid opening the oven early to prevent the cake from collapsing.
Checking for Doneness
The bubbling fruit is your cue. Insert a toothpick into the center; it should come out clean or with a few moist crumbs. Let the cake sit for 5–10 minutes after baking to set slightly before serving.
Serving Mini Cuppa Cake
With Ice Cream or Whipped Cream
Serve warm slices with a generous scoop of vanilla ice cream or a dollop of whipped cream. The contrast between the warm fruit topping and the cool ice cream enhances flavors and textures, making every bite indulgent.
Presentation Tips
For a colorful presentation, drizzle a little of the fruit syrup over the top or sprinkle lightly with powdered sugar. Serve directly in the pan for a rustic, homely feel or cut into squares for individual servings.
Variations and Flavor Boosts
Adding Nuts or Spices
Sprinkle chopped pecans or walnuts over the flour-sugar layer before adding fruit. Add a pinch of cinnamon or nutmeg to the dry ingredients for a warm, aromatic flavor.
Using Different Fruits
Swap fruit cocktail for pineapple chunks, peaches, or berries. Fresh fruit can be used, but canned fruit in juice provides moisture and sweetness that balance perfectly with the buttery base.
Storage and Reheating
Storing Leftovers
Cover cooled cake with plastic wrap or foil. Store at room temperature for up to 2 days or in the fridge for 4–5 days. Avoid airtight containers if the fruit topping is still warm to prevent condensation.
Reheating Tips
Reheat slices in the microwave for 20–30 seconds or in a preheated oven at 300°F (150°C) for 10 minutes. Serve again with ice cream or whipped cream for a fresh, dessert-like experience.
Tips for Beginners
Measuring Ingredients Correctly
Use proper measuring cups for flour and sugar to ensure the right texture. Spoon flour into the cup and level with a knife instead of scooping directly from the bag.
Keeping the Layers Separate
Pouring melted butter first and layering flour and sugar on top without mixing ensures a crisp base under the soft fruit topping. This technique is key to a successful Mini Cuppa Cake.
FAQ
1. Can I use all-purpose flour instead of self-rising flour?
Yes, but add 1½ teaspoons of baking powder and ¼ teaspoon salt per cup of flour.
2. Can I make this cake ahead of time?
Yes, bake and cool completely. Store covered in the fridge and reheat before serving.
3. Can I use fresh fruit instead of canned?
Yes, but increase baking time slightly to account for less juice.
4. How do I know when the cake is done?
The edges should be golden, the fruit bubbling, and a toothpick inserted should come out clean or with moist crumbs.
5. Can I make mini individual portions?
Absolutely! Use ramekins or a muffin tin, adjusting baking time to 20–25 minutes.
Conclusion
Mini Cuppa Cake is a simple, delightful dessert that brings comfort and joy. With a buttery base, sweet fruit topping, and easy preparation, it’s perfect for beginners and busy bakers alike. Serve it warm with ice cream or whipped cream, and you’ll have a crowd-pleasing treat that’s both nostalgic and delicious.


Leave a Reply