
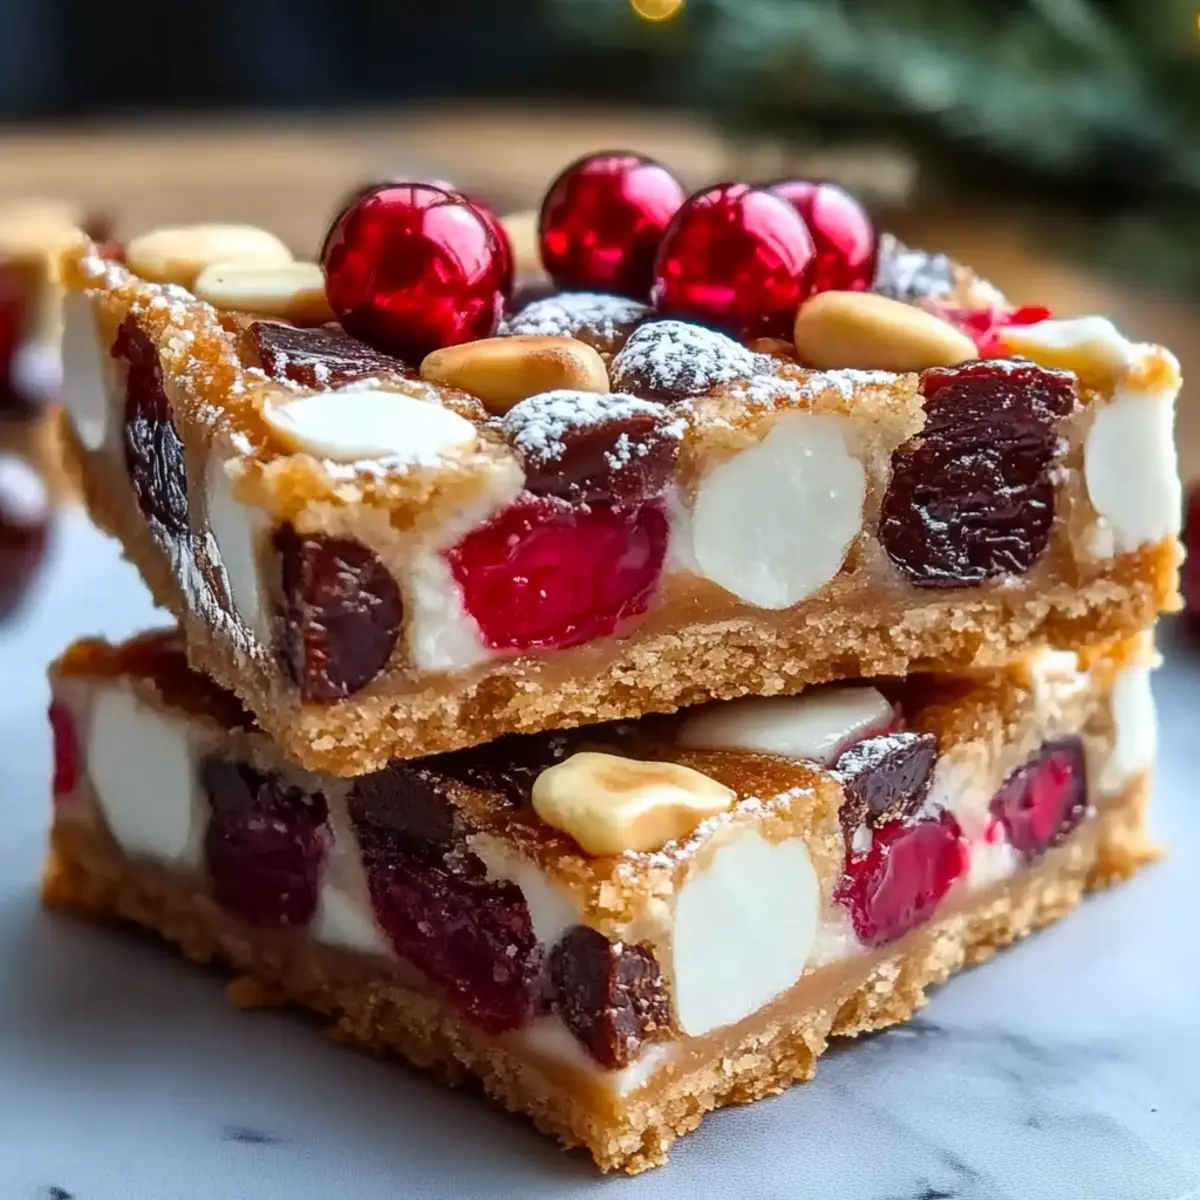
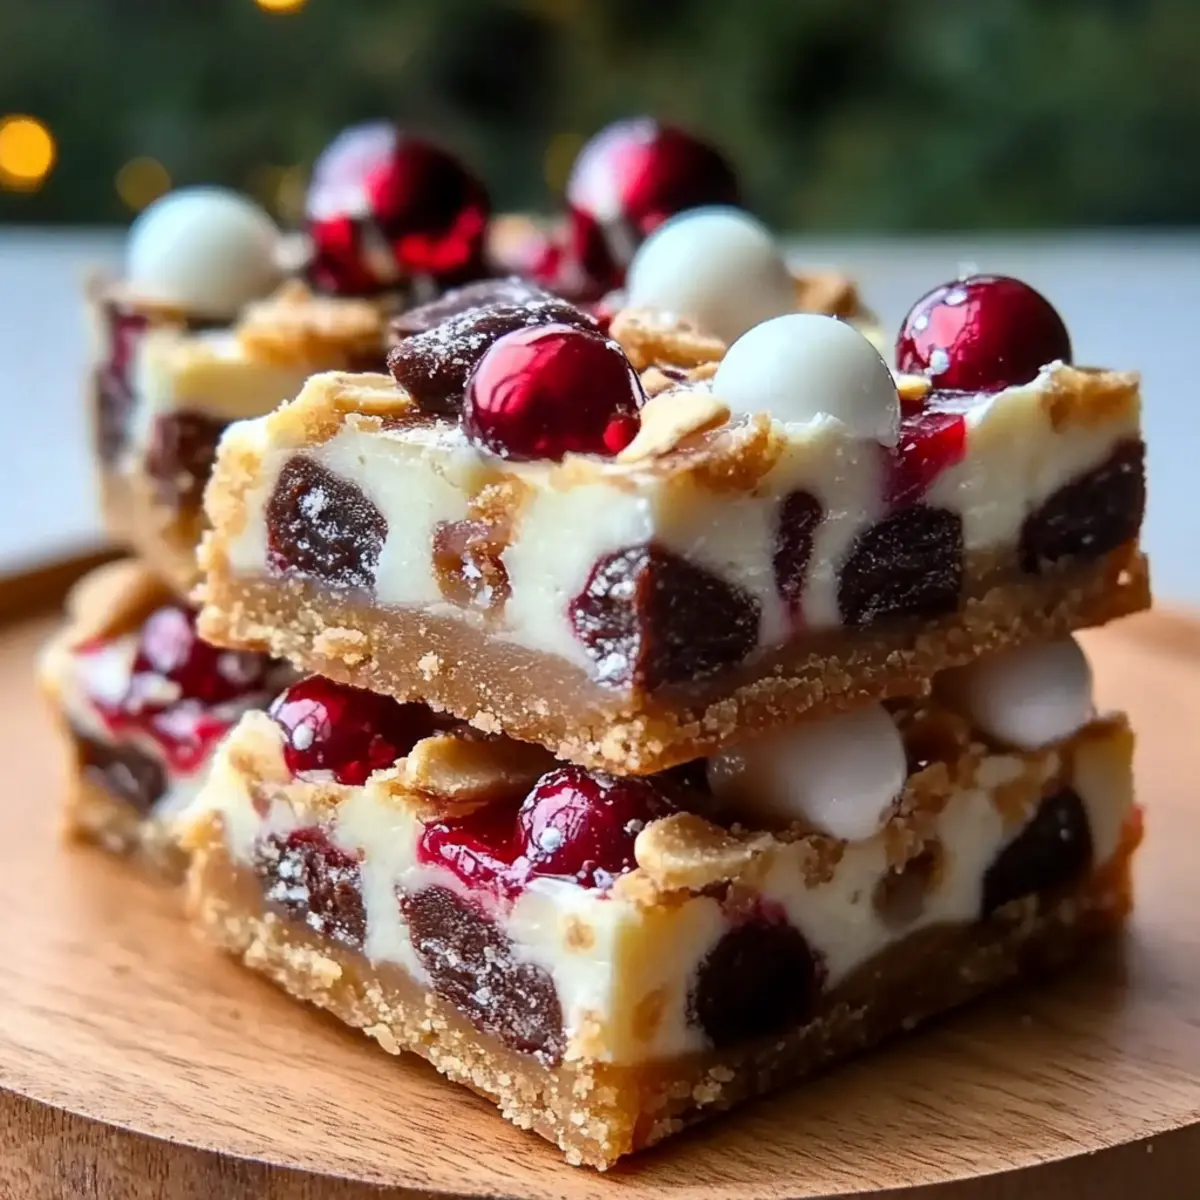
As the holiday season approaches, the warm scent of chocolate and marshmallows begins to fill the air, instantly lifting my spirits. Just the thought of Christmas bars brings back fond memories of family gatherings, where laughter and cozy conversations blend perfectly with delicious treats. These delightful bars are a sweet escape from the fast-paced holiday hustle, allowing you to indulge in a fudgy, chewy experience that’s incredibly easy to whip up in just 45 minutes.
What I love about this recipe is its versatility—a canvas for creativity! Whether you choose to go nut-free, gluten-free, or even vegan, these bars can be customized to fit any dietary preference without sacrificing that rich, festive flavor. So gather your loved ones, roll up your sleeves, and get ready to experience the joy of making these Christmas bars together. They’re not just a dessert; they’re an invitation to create new memories, one delicious bite at a time!

Why are Christmas Bars a holiday must?
Versatile Delight: No matter your dietary needs, these bars can be made nut-free, gluten-free, or vegan, ensuring everyone can enjoy them.
Quick and Easy: With simple steps, you can whip these up in just 45 minutes—perfect for busy holiday schedules.
Rich Flavor: The combination of chocolate, marshmallows, and optional nuts creates a taste that’s both decadent and comforting.
Shareable Treat: Cut the bars into small squares to make them easy to share at festive gatherings or cozy nights in with friends.
Customizable Fun: Experiment with different mix-ins or toppings, allowing you to get creative and tailor the bars to your preferences, just like with our other delicious holiday treats.
Essential Christmas Bars Ingredients
For the Base
- Graham Cracker Crumbs – Form the sweet and crunchy base; can substitute whole graham crackers if desired.
- Unsweetened Cocoa Powder – Provides a rich chocolate flavor; use high-quality cocoa for best results.
- Powdered Sugar – Adds sweetness and a smooth texture, essential for a melt-in-your-mouth experience.
- Unsalted Butter (melted) – Binds ingredients together and adds richness; substitute with melted coconut oil for a dairy-free option.
- Sweetened Condensed Milk – Contributes moisture and sweetness, crucial for achieving a chewy texture.
For the Mix-ins
- Mini Marshmallows – Provide a fun, chewy element; regular marshmallows can be used but mini ones distribute better.
- Chocolate Chips – Adds extra chocolate flavor; feel free to use dark, milk, or white chocolate chips.
- Chopped Nuts (optional) – Adds crunch; walnuts or pecans are recommended; omit if allergic.
Get ready to make these delicious Christmas bars that will surely delight everyone at your holiday gatherings!
How to Make Christmas Bars
-
Preheat the Oven: Preheat your oven to 350°F (175°C) to ensure even baking of your delicious bars.
-
Mix Dry Ingredients: In a large bowl, whisk together graham cracker crumbs, cocoa powder, and powdered sugar until you achieve a well-combined mix that’s slightly sandy in texture.
-
Add Wet Ingredients: Pour in the melted butter and sweetened condensed milk, stirring until the mixture becomes thick and sticky, bonding all the delightful flavors.
-
Fold in Mix-ins: Gently add mini marshmallows, chocolate chips, and nuts if using, ensuring even distribution while being careful not to overmix—this helps keep the creamy marshmallow texture intact!
-
Spread and Bake: Transfer the mixture to a greased baking pan, smoothing the top with a spatula. Bake for 25-30 minutes until the edges are beautifully set and the center feels slightly firm.
-
Cool and Cut: Allow the bars to cool completely in the pan before cutting them into squares; this will ensure they hold their shape and don’t crumble apart.
Optional: Dust with powdered sugar for a festive touch before serving.
Exact quantities are listed in the recipe card below.
How to Store and Freeze Christmas Bars
-
Room Temperature: Keep your Christmas bars in an airtight container at room temperature for up to 1 week, ensuring they stay fresh and chewy.
-
Fridge: If you prefer a chilled treat, store them in the fridge for up to 2 weeks. Be sure to seal them well to prevent drying out.
-
Freezer: For longer storage, you can freeze these bars for up to 3 months. Wrap tightly in plastic wrap or aluminum foil, then place in an airtight container.
-
Reheating: To enjoy bars straight from the freezer, thaw in the fridge overnight, then allow them to come to room temperature before serving. Optionally, warm them in the microwave for a few seconds for that fresh-out-of-the-oven feel!
Expert Tips for Perfect Christmas Bars
-
Measure Accurately: Use precise measurements for your ingredients to ensure the bars have the perfect texture. Too much cocoa or sugar can alter consistency.
-
Melt Butter Fully: Make sure your butter is completely melted to aid in blending. Undermelted butter can lead to a lumpy mixture and uneven baking.
-
Chill Before Cutting: Let your Christmas bars cool completely before cutting; this prevents crumbling and allows for cleaner, neater squares.
-
Mix-Ins Matter: Experiment with mix-ins, like dried fruits or different chocolates, to elevate flavors, but don’t overload to keep the bar structure intact.
-
Store Right: For the best results, store bars in an airtight container to maintain freshness and don’t introduce moisture, which can make them soggy.
Make Ahead Options
These delightful Christmas bars are perfect for meal prep, allowing you to enjoy the festive season with ease! You can prepare the base mixture up to 24 hours in advance; simply combine the dry and wet ingredients and refrigerate until you’re ready to bake. When you’re set to treat your guests, pour the mixture into a greased pan and bake as directed. For optimal freshness, be sure to cover the bars tightly with plastic wrap or store in an airtight container after cooling to avoid any drying out. Just imagine—prepping ahead gives you more time to celebrate without compromising on flavor or quality!
Christmas Bars Variations
With a dash of creativity, you can easily make these festive bars uniquely yours!
- Nut-Free: Omit chopped nuts and add extra chocolate chips for a purely indulgent experience.
- Gluten-Free: Swap graham cracker crumbs for gluten-free graham crackers or almond flour to accommodate dietary needs.
- Vegan: Use melted coconut oil and a vegan sweetened condensed milk for a plant-based version.
- Mint Chocolate Twist: Stir in a teaspoon of peppermint extract for a refreshing, holiday-inspired flavor boost.
- Fruit and Nut Medley: Include dried cranberries or cherries along with walnuts for a deliciously colorful and flavorful addition.
- Spicy Kick: Add a pinch of cayenne pepper to the mix for a surprising warmth that contrasts beautifully with the sweetness.
- Coconut Lover’s Delight: Incorporate toasted coconut flakes for a tropical twist that brightens the rich chocolate base.
- S’mores Surprise: Replace mini marshmallows with toasted mini marshmallows on top, reminiscent of classic campfire treats.
Let these variations inspire you, and enjoy the delightful adventure of making your Christmas bars!
What to Serve with Christmas Bars?
As the holidays twinkle around us, pairing these delightful bars with complementary dishes brings joy to every bite.
- Hot Cocoa: The rich chocolate of the bars pairs perfectly with a warm cup of cocoa, creating a cozy, indulgent experience.
- Spiced Apple Cider: Serve this warm, spiced drink alongside your bars for a festive and aromatic contrast, enhancing the holiday spirit.
- Vanilla Ice Cream: A scoop of creamy vanilla ice cream adds a delightful chill and richness that balances the fudgy texture of the bars.
Picture enjoying a slice of Christmas bar alongside a hot cup of cocoa, the flavors mingling to create a nostalgic holiday harmony. It’s the little moments like these that create lasting memories.
- Powdered Sugar Dusting: Adding a light dusting of powdered sugar elevates the presentation and sweetness, giving them a charming festive touch.
- Fresh Berries: A side of seasonal berries, like raspberries or strawberries, adds tartness and color, brightening each bite with freshness.
- Mint Chocolate Peppermint Tea: This refreshing tea complements the chocolate flavor of the bars, making for a sophisticated pairing that warms the soul.
- Mixed Nuts: A bowl of crunchy mixed nuts on the side contrasts beautifully with the chewy texture of the bars, providing a satisfying crunch.
Christmas Bars Recipe FAQs
How do I choose ripe ingredients for my Christmas Bars?
When it comes to the mini marshmallows, it’s best to use fresh ones that are soft and fluffy, free of any hard spots. As for the butter, ensure it’s unsalted and fully melted—this enhances the integrity of your batter. If you’re adding nuts, select ones that are chopped and not stale; you’ll want fresh walnuts or pecans for the best flavor.
How should I store my Christmas Bars?
Store your Christmas Bars in an airtight container at room temperature for up to 1 week. If you prefer a chilled treat, the fridge is perfect—they’ll stay fresh for up to 2 weeks if sealed well. Just remember, moisture is the enemy; keep them dry to maintain that chewy texture!
Can I freeze my Christmas Bars for later?
Absolutely! These festive treats freeze remarkably well. Wrap each bar individually in plastic wrap or aluminum foil, then place them in an airtight container. You can freeze them for up to 3 months. When you’re ready to enjoy, simply thaw them in the fridge overnight or let them sit at room temperature for a bit.
What common issues might I face when making my Christmas Bars?
One common issue is having the bars crumble when cutting. To prevent this, make sure to allow the bars to cool completely in the pan before slicing. If they feel too soft once baked, they may need a bit more time in the oven—check at the 25-minute mark to ensure they are set around the edges and slightly firm in the center.
Are there any dietary considerations for Christmas Bars?
Yes! This recipe can be customized to fit various dietary needs. If there are nut allergies, simply omit the chopped nuts and add a few extra chocolate chips. For gluten-free options, substitute graham cracker crumbs with gluten-free graham crackers or almond flour. Additionally, if you’re looking for a vegan version, use melted coconut oil and vegan sweetened condensed milk.
Can I adjust the sweetness of the bars?
Certainly! If you find the bars too sweet, consider reducing the powdered sugar or using unsweetened cocoa powder for a richer chocolate flavor. Alternatively, for a lower-sugar version, opt for sugar substitutes that work well in baking, but keep in mind that this may affect texture and moisture levels. Experiment until you find the perfect balance for your taste buds!

Indulgent Christmas Bars: Easy, Festive Treats to Wow Guests
Equipment
- large bowl
- Baking Pan
Ingredients
For the Base
- 2 cups Graham Cracker Crumbs Can substitute with whole graham crackers if desired.
- 1/2 cup Unsweetened Cocoa Powder Use high-quality cocoa for best results.
- 1 cup Powdered Sugar Essential for a melt-in-your-mouth experience.
- 1/2 cup Unsalted Butter (melted) Substitute with melted coconut oil for a dairy-free option.
- 1 can Sweetened Condensed Milk Contributes moisture and sweetness.
For the Mix-ins
- 2 cups Mini Marshmallows Regular marshmallows can be used but mini ones distribute better.
- 1 cup Chocolate Chips Feel free to use dark, milk, or white chocolate chips.
- 1/2 cup Chopped Nuts (optional) Walnuts or pecans are recommended; omit if allergic.
Instructions
Preparation
- Preheat your oven to 350°F (175°C) to ensure even baking of your delicious bars.
- In a large bowl, whisk together graham cracker crumbs, cocoa powder, and powdered sugar until you achieve a well-combined mix that’s slightly sandy in texture.
- Pour in the melted butter and sweetened condensed milk, stirring until the mixture becomes thick and sticky.
- Gently add mini marshmallows, chocolate chips, and nuts if using, ensuring even distribution while being careful not to overmix.
- Transfer the mixture to a greased baking pan, smoothing the top with a spatula. Bake for 25-30 minutes until the edges are beautifully set and the center feels slightly firm.
- Allow the bars to cool completely in the pan before cutting them into squares.
- Optional: Dust with powdered sugar for a festive touch before serving.


Leave a Reply