
- Introduction
Creating a Beach in a Glass Coastal Ornament is not just a fun DIY project; it’s an imaginative way to bring the serenity of the ocean to your home. This delightful ornament captures the essence of coastal living, allowing you to enjoy the beauty of the beach year-round. It’s a perfect activity for all ages, making it ideal for family gatherings or a peaceful solo project. With just a few materials and steps, you can craft a stunning centerpiece that reflects your love for the sea. Plus, it serves as a stylish reminder of sunny days, sandy shores, and gentle waves.
- Why You’ll Love This Beach in a Glass Coastal Ornament
- Creative Outlet: Unleash your creativity and personalize each ornament to reflect your style.
- Relaxing Activity: Immerse yourself in a calming, therapeutic craft to reduce stress.
- Unique Home Decor: Add a touch of the beach to your interior design, perfect for any room.
- Great Gift Idea: Handmade gifts are heartfelt and appreciated; these ornaments make perfect presents.
- Family Bonding: Involve kids or loved ones for a fun bonding experience that everyone can treasure.
- Materials
- Clear glass container or jar
- Sand (beach sand or craft sand)
- Small shells or sea glass
- Miniature figurines (e.g., beach chairs, umbrellas)
- Blue food coloring (optional)
- Water
- Tweezers or small tools (for placement)
- Optional: Dried flowers or small pebbles for added texture
- Step-by-Step Instructions
Prepare Your Container
- Clean your glass container thoroughly to ensure clarity.
- Dry the inside completely before starting.
Create the Base Layer
- Pour a layer of sand into the bottom of the container, about 1 inch thick.
- Use your fingers to spread it evenly; consider the texture and aesthetics.
Add Shells and Figurines
- Arrange small shells and sea glass on top of the sand layer.
- Use tweezers for precise placement. Think about balance and composition.
Layering Sands
- If desired, add a second layer of colored sand or another texture.
- Sprinkle in a few drops of blue food coloring for a marine effect.
Fill with Water
- Slowly pour water into the container until it reaches the desired level.
- Avoid disturbing the sand or decorative items. Watch how the light filters through!
Final Touches
- Add more shells or figurines on the water’s surface if needed.
- Seal the container if you plan to keep it for a long time.
- Tips & Variations
- Personalization: Use shells or sea glass collected from family vacations for a sentimental touch.
- Color Options: Experiment with different food coloring hues for a unique look.
- Theme Variations: Create seasonal ornaments by adding festive decorations – like tiny pumpkins for fall.
- Container Types: Consider using different shaped vases or jars for varied aesthetics.
- Frequently Asked Questions
Q1: Can I use artificial sand instead of natural beach sand?
A1: Yes, craft sand works well and comes in many colors to match your decor.
Q2: What if I don’t have small beach figurines?
A2: You can substitute with small toys or elements that evoke beach vibes, like a tiny fish or starfish.
Q3: How do I ensure the shells sink and do not float?
A3: Choose heavier shells, or place them carefully beneath the sand layer, ensuring they are securely embedded.
Q4: Is it possible to create a layered ocean look with multiple colors?
A4: Absolutely! Layer different colored sands for a gorgeous ombre ocean effect.
- Serving Suggestions or Pairings
While this is primarily a decorative item, consider pairing your Beach in a Glass Coastal Ornament with ocean-themed drinks like blue cocktails or sparkling lemonade. Use it as a centerpiece at seaside barbecues, or alongside clam chowder for a complete coastal atmosphere.
- Final Thoughts
Crafting this Beach in a Glass Coastal Ornament is a wonderful way to celebrate your love for the ocean. Not only does it brighten up your space, but it also allows for endless creativity and personalization. We encourage you to share your unique versions in the comments below or any tips that worked well for you! Let’s inspire others to create their own slice of paradise at home!
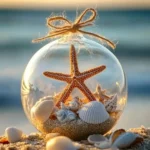
Beach in a Glass Coastal Ornament
Ingredients
Materials Needed
- 1 clear glass container Clear glass container or jar Choose an appropriate size
- 1 cup Sand (beach sand or craft sand) Use either beach sand or craft sand
- to taste Small shells or sea glass Shells or sea glass for decoration
- 2-3 Miniature figurines e.g., beach chairs, umbrellas
- a few drops Blue food coloring (optional) For a marine effect
- as needed cup Water To fill the container
- 1 Tweezers or small tools For precise placement of items
- optional Dried flowers or small pebbles For added texture
Instructions
Preparation
- Clean your glass container thoroughly to ensure clarity.
- Dry the inside completely before starting.
Creating the Ornament
- Pour a layer of sand into the bottom of the container, about 1 inch thick.
- Use your fingers to spread it evenly; consider the texture and aesthetics.
- Arrange small shells and sea glass on top of the sand layer.
- Use tweezers for precise placement. Think about balance and composition.
- If desired, add a second layer of colored sand or another texture.
- Sprinkle in a few drops of blue food coloring for a marine effect.
- Slowly pour water into the container until it reaches the desired level.
- Avoid disturbing the sand or decorative items. Watch how the light filters through!
- Add more shells or figurines on the water’s surface if needed.
- Seal the container if you plan to keep it for a long time.

Leave a Reply