
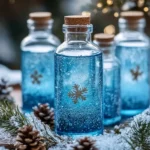
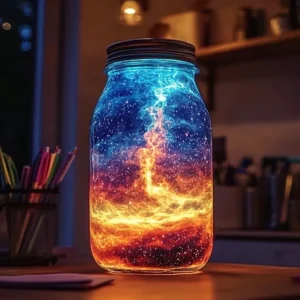
Winter is a magical season often characterized by its frosty landscapes, sparkling snow, and cozy evenings by the fireplace. One of the best ways to capture and celebrate this enchanting time of year is through the creation of winter sensory bottles. These DIY projects not only serve as captivating decorations but also as wonderful sensory experiences for children and adults alike. Filled with shimmering glitter, faux snow, and winter-themed elements, sensory bottles can engage the senses and provide calming effects. Whether you’re looking for a fun craft to do with the kids or simply wish to add some festive flair to your home, winter sensory bottles are the perfect solution!
Why You’ll Love This Winter Sensory Bottles
- Stress Relief: Watching the glitter swirl in the bottle can be a soothing and calming experience.
- Creative Expression: Personalize your sensory bottle with various colors and materials.
- Educational Fun: Great for teaching children about winter themes and sensory exploration.
- Easy to Make: Simple steps that can be completed in under an hour.
- Decorative Flair: A beautiful addition to your winter decor.
Materials
- Clear plastic or glass bottle with a screw-top
- Distilled water
- Glitter (silver, white, blue)
- Fake snow or cotton balls
- Small winter-themed decorations (miniature pinecones, snowflakes, etc.)
- Clear glue or glycerin (optional for slowing down the glitter)
- Food coloring (optional, for added color)
Step-by-Step Instructions
Prepare Your Bottle
- Clean Your Bottle: Ensure the bottle is clean and dry.
- Gather Materials: Lay out all the materials for easy access.
Create the Sensory Liquid
- Add Water: Fill the bottle about 3/4 full with distilled water.
- Incorporate Clear Glue or Glycerin: For a thicker liquid, mix in a tablespoon of clear glue or glycerin.
- Add Food Coloring: If desired, add a drop or two of food coloring to give a subtle hue.
Add Winter Elements
- Include Glitter: Sprinkle in varying amounts of silver, white, or blue glitter.
- Add Fake Snow: Toss in fake snow or a few cotton balls for texture.
- Insert Decorations: Place small winter-themed decorations into the bottle.
Final Touches
- Seal the Bottle: Tightly secure the cap to prevent any spills.
- Shake and Enjoy: Gently shake the bottle and watch the mesmerizing movement of glitter and snow.
Tips & Variations
- Color Swaps: Experiment with different color combinations of glitter and food coloring to match your decor.
- Decor Additions: Get creative by adding small toys that represent winter, like miniature children playing in the snow.
- Themed Bottles: Create bottles themed around holidays, like winter solstice or New Year, using corresponding decorations.
- Scented Option: A few drops of essential oil (like peppermint) can add a delightful scent to your sensory experience.
Frequently Asked Questions
Q1: Can I use tap water instead of distilled water?
A1: It’s best to use distilled water as it helps prevent cloudiness over time.
Q2: How long will the sensory bottle last?
A2: If sealed well, your sensory bottle can last for years without degrading.
Q3: What if my glitter clumps together?
A3: Adding more glycerin or clear glue can help keep the glitter suspended and prevent clumping.
Q4: Can I make this project with kids?
A4: Absolutely! Just supervise them during the process, especially with small decorative items.
Serving Suggestions or Pairings
While sensory bottles are a standalone creative project, you can pair them with warm, comforting beverages like hot cocoa or spiced apple cider. Additionally, enjoy the sensory experience alongside a delicious plate of winter-themed cookies or a cozy winter book reading session with your family.
Final Thoughts
Winter sensory bottles are not only a fun craft but also a way to encapsulate the serene beauty of the season. Get creative, and don’t hesitate to mix and match your materials for a personalized touch. We’d love to see your versions! Share your creations or leave a comment below with your experiences or any tips you discovered along the way. Happy crafting!
Winter Sensory Bottles
Ingredients
Main Ingredients
- 1 bottle Clear plastic or glass bottle with a screw-top Ensure the bottle is clean and dry.
- 3/4 cup Distilled water Best for preventing cloudiness.
- to taste Glitter (silver, white, blue) Use varying amounts for a beautiful effect.
- 1 tablespoon Clear glue or glycerin Optional; used for slowing down the glitter.
- few drops Food coloring Optional; for added color.
- to taste Fake snow or cotton balls For texture in the sensory bottle.
- several Small winter-themed decorations (miniature pinecones, snowflakes, etc.) To enhance the winter theme.
Instructions
Preparation
- Clean your bottle to ensure it is clean and dry.
- Gather all materials for easy access.
Create the Sensory Liquid
- Fill the bottle about 3/4 full with distilled water.
- Mix in a tablespoon of clear glue or glycerin for a thicker liquid.
- If desired, add a drop or two of food coloring for a subtle hue.
Add Winter Elements
- Sprinkle in varying amounts of silver, white, or blue glitter.
- Toss in fake snow or a few cotton balls for added texture.
- Place small winter-themed decorations into the bottle.
Final Touches
- Tightly secure the cap to prevent any spills.
- Gently shake the bottle and watch the mesmerizing movement of glitter and snow.
Leave a Reply