A flawless Mirror Glaze for Cakes transforms an ordinary dessert into a stunning centerpiece. With its smooth, glass-like shine and vibrant color, this glaze creates the elegant finish often seen in high-end pastry shops. Despite its professional appearance, making a mirror glaze at home is surprisingly achievable with the right ingredients and simple techniques.
The magic of Mirror Glaze for Cakes comes from a combination of gelatin, white chocolate, sugar, and condensed milk. When poured at the correct temperature over a frozen cake, the glaze flows smoothly and sets into a glossy coating that reflects light beautifully.
Because this glaze works best on chilled mousse cakes, entremets, or smooth buttercream cakes, it is a favorite among home bakers who want to elevate their dessert presentation. With a little patience and attention to temperature, you can create a bakery-style finish that looks as impressive as it tastes.
A Sweet Story Behind Mirror Glaze Cakes
The first time I saw a cake covered in mirror glaze, it looked almost too perfect to be real. The surface shined like polished glass, reflecting light across the room. Curious about how such a beautiful finish was created, I decided to try making one at home. The process felt surprisingly simple once I understood the steps: bloom the gelatin, melt the chocolate, and pour the glaze at just the right temperature. When the glaze cascaded over the frozen cake, it formed a perfectly smooth surface that looked straight from a pastry shop. Since then, mirror glaze has become a favorite technique for turning simple cakes into showstopping desserts.
What Makes Mirror Glaze So Special
The Signature Glossy Finish
The most recognizable feature of Mirror Glaze for Cakes is its stunning shine. Unlike traditional frosting or ganache, mirror glaze sets into a perfectly smooth surface that reflects light.
This glossy effect comes from the balance between gelatin and chocolate. Gelatin provides structure and elasticity, while white chocolate adds richness and smooth texture.
Because of this combination, the glaze coats the cake evenly without becoming too thick or dull. As a result, the finished dessert looks sleek and professional.
Another advantage of mirror glaze is its ability to hold vibrant colors. Food coloring blends easily into the glaze, allowing bakers to create dramatic finishes ranging from bold jewel tones to soft pastels.
Perfect for Modern Cake Designs
Mirror glaze gained popularity through modern pastry techniques, especially in European-style entremets and mousse cakes. These desserts typically have very smooth surfaces, which allow the glaze to flow evenly.
Because the glaze highlights every detail, a well-prepared cake surface is essential. Smooth mousse or buttercream creates the best foundation.
The glaze then pours over the cake and drips naturally down the sides. Once set, the surface looks polished and flawless.
For special occasions such as birthdays, weddings, and celebrations, mirror glaze instantly elevates a simple cake into an elegant dessert.
Ingredients for a Perfect Mirror Glaze
Key Components of the Glaze
Although the final result looks complex, Mirror Glaze for Cakes requires only a few essential ingredients.
Sugar forms the base of the glaze and provides sweetness while helping create the shiny texture.
Water dissolves the sugar and allows the mixture to heat evenly.
Condensed milk adds richness and helps create the creamy body of the glaze. It also balances the sweetness.
Gelatin acts as the stabilizing agent. Once dissolved, it allows the glaze to set smoothly on the cake without becoming rigid.
White chocolate contributes both flavor and structure. As it melts into the mixture, it creates the silky consistency needed for the mirror effect.
Food coloring provides the vibrant visual appeal that makes mirror glaze cakes so striking.
Choosing the Best Ingredients
High-quality white chocolate plays an important role in achieving a smooth glaze. Chocolate with real cocoa butter melts more evenly and creates a better texture.
Similarly, using gel food coloring rather than liquid coloring helps maintain the glaze consistency while delivering bright color.
By selecting good-quality ingredients, you ensure the glaze remains smooth, glossy, and visually impressive.
Step-by-Step Guide to Making Mirror Glaze
Preparing the Gelatin
Begin by blooming the gelatin. Place the gelatin in a small bowl with a little cold water and let it sit for about five minutes.
During this time, the gelatin absorbs the water and swells. This step ensures that it dissolves smoothly later in the process.
Meanwhile, prepare the rest of the ingredients so everything is ready once the syrup is heated.
Heating the Sugar Mixture
Next, combine the sugar and water in a saucepan. Heat the mixture over medium heat while stirring gently until the sugar fully dissolves.
Afterward, add the condensed milk and stir until the mixture becomes smooth and evenly combined.
Remove the saucepan from the heat before adding the gelatin. Stir in the bloomed gelatin until it completely dissolves.
Melting the Chocolate
Place the chopped white chocolate in a heatproof bowl.
Pour the hot mixture over the chocolate and allow it to sit for a moment. The heat melts the chocolate gradually.
Then stir slowly until the chocolate melts fully and the mixture becomes silky and smooth.
Add food coloring at this stage and blend gently until the color appears even.
Cooling and Pouring the Glaze
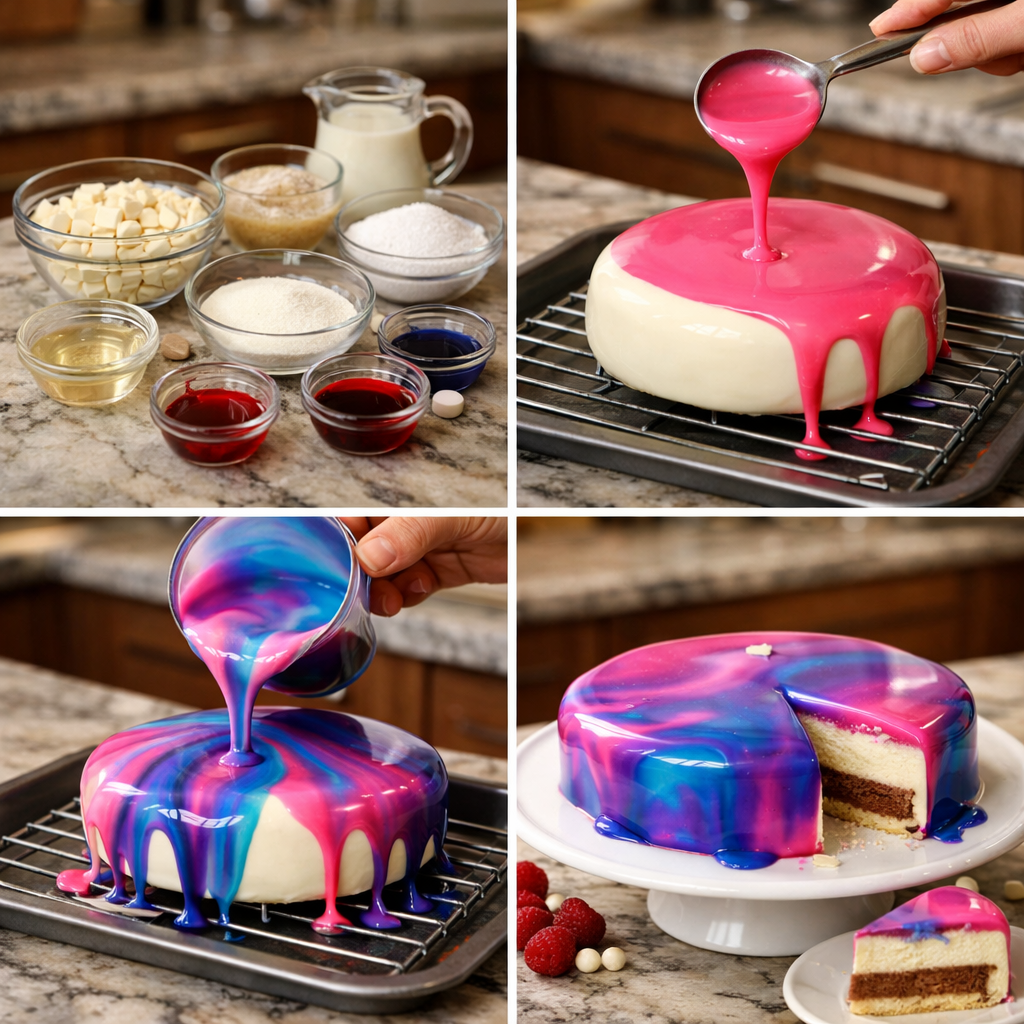
Allow the glaze to cool to approximately 90°F (32°C). This temperature is crucial because it allows the glaze to flow smoothly without melting the cake beneath it.
Place the frozen cake on a rack with a tray underneath to catch excess glaze.
Then pour the glaze over the center of the cake, allowing it to cascade naturally down the sides.
Within moments, the glaze settles into a glossy mirror-like finish.
Tips for Achieving the Best Mirror Glaze
Temperature Is Everything
One of the most important factors when making Mirror Glaze for Cakes is temperature control.
If the glaze is too hot, it will run off the cake too quickly. If it is too cool, it may appear thick or uneven.
Maintaining the correct temperature ensures the glaze flows smoothly while maintaining its shine.
Create Beautiful Color Effects
Mirror glaze offers endless creative possibilities.
You can divide the glaze into separate bowls and add different colors. Pouring multiple colors together creates a stunning marbled effect.
Another technique involves swirling colors lightly with a toothpick before pouring the glaze.
These artistic touches allow each cake to become a unique visual masterpiece.
Frequently Asked Questions
Can mirror glaze be made ahead of time?
Yes. Mirror glaze can be stored in the refrigerator for several days. Reheat it gently and stir until smooth before using.
Why must the cake be frozen?
A frozen cake helps the glaze set instantly, creating the signature smooth finish.
How do I remove air bubbles?
Straining the glaze through a fine sieve or tapping the bowl gently helps eliminate bubbles.
Can I reuse leftover glaze?
Yes. Extra glaze collected in the tray can be stored and reheated for another cake.
What cakes work best with mirror glaze?
Mousse cakes, entremets, and smoothly frosted cakes provide the best surface for mirror glaze.
Conclusion
A beautiful Mirror Glaze for Cakes turns a simple dessert into a stunning centerpiece. With its glossy finish and vibrant color, this technique adds elegance and creativity to any cake.
Although the result looks professional, the process itself is straightforward. By carefully preparing the glaze and pouring it at the right temperature, even beginner bakers can achieve impressive results.
Once you master mirror glaze, you will discover endless possibilities for decorating cakes that look as extraordinary as they taste.
Equipment
- Saucepan
- mixing bowls
- Spatula or whisk
- Cooling rack
- Baking Tray To catch excess glaze
Ingredients
- 1 cup sugar
- 3/4 cup water
- 3/4 cup condensed milk
- 1/2 oz gelatin
- 8 oz white chocolate, chopped
- 1 as needed food coloring of choice
Instructions
- Bloom gelatin by mixing it with a small amount of cold water and let it sit for about 5 minutes.
- In a saucepan, heat sugar and water over medium heat until the sugar fully dissolves.
- Add condensed milk and stir until well combined.
- Remove from heat and stir in the bloomed gelatin until completely dissolved.
- Pour the hot mixture over chopped white chocolate and let sit briefly, then stir until smooth.
- Add food coloring and blend gently until evenly colored.
- Allow glaze to cool to about 90°F (32°C).
- Pour the glaze over a frozen cake placed on a rack and allow it to flow down the sides.


Leave a Reply