Soft Homemade Pita Bread is one of the most satisfying breads to make from scratch. With just a handful of simple ingredients and a hot skillet or tawa, you can create soft, fluffy pita pockets that puff beautifully as they cook. This Soft Homemade Pita Bread recipe produces warm, flexible flatbreads perfect for wraps, sandwiches, or dipping into hummus and sauces.
Unlike many bread recipes, this one does not require an oven. Instead, the dough cooks quickly on a hot stovetop pan, making it ideal for quick homemade bread anytime. As each round of dough hits the hot tawa, steam forms inside and creates the signature pita pocket.
Whether you use it for shawarma wraps, falafel sandwiches, or simply tear pieces for dipping, Soft Homemade Pita Bread delivers fresh bakery-style results right in your kitchen.
Before we explore the details of the recipe, here is a short story about how this classic bread often becomes a household favorite.
One evening, a craving for fresh bread led to a simple experiment in the kitchen. With just flour, yeast, water, and olive oil, a soft dough came together and rested quietly on the counter. Soon, small rounds of dough were rolled and placed onto a hot skillet. Within seconds, the dough puffed into perfect pockets like magic. The warm bread was stacked under a towel, ready to be filled with vegetables and grilled chicken. That simple moment turned homemade pita bread into a weekly tradition, proving that fresh bread can be both easy and incredibly rewarding.
Why Soft Homemade Pita Bread Is So Popular
Fresh Bread Without an Oven
Many people assume homemade bread requires baking in the oven, but Soft Homemade Pita Bread proves otherwise. Because pita cooks directly on a hot pan, the recipe works perfectly even in kitchens without an oven.
As the dough cooks on the skillet, the heat quickly causes steam to form inside the bread. This steam creates the characteristic puff that forms a pocket in the center.
The entire cooking process takes only a few minutes per pita, making it faster than most traditional bread recipes.
Because of this simplicity and speed, many home cooks enjoy making pita fresh whenever they need it.
Perfect for Wraps, Sandwiches, and Dips
Soft Homemade Pita Bread works well for many types of meals.
When sliced open, the pocket can hold fillings like grilled chicken, falafel, vegetables, or hummus. The bread remains soft and flexible, making it ideal for wraps and sandwiches.
Pita also works wonderfully when cut into wedges and served with dips like hummus, baba ganoush, or tzatziki.
Another option is to toast the pita lightly and use it as a base for flatbread-style pizzas.
Because of its versatility, Soft Homemade Pita Bread easily becomes a staple bread in many kitchens.
Ingredients That Create Perfect Pita Bread
Simple Pantry Ingredients
One of the reasons this recipe works so well is its simplicity. The dough uses only a few basic ingredients that many kitchens already have.
All-purpose flour provides the structure for the dough while still keeping the bread soft.
Active dry yeast allows the dough to rise and become light and airy. The yeast also contributes to the signature puff during cooking.
Warm water activates the yeast and hydrates the flour, helping the dough develop elasticity.
Salt enhances the flavor of the bread and balances the dough.
Olive oil adds richness and helps keep the pita soft and tender.
A small amount of sugar feeds the yeast and helps the dough rise more efficiently.
The Importance of Yeast Activation
Properly activating the yeast is essential for Soft Homemade Pita Bread.
Mixing the yeast with warm water and sugar allows it to become active before adding it to the flour. After a few minutes, the mixture becomes frothy and bubbly.
This step confirms that the yeast is alive and ready to help the dough rise.
If the mixture does not foam, the yeast may be inactive and should be replaced to ensure successful bread.
How to Make Soft Homemade Pita Bread
Preparing and Kneading the Dough
Begin by combining the yeast, sugar, and warm water in a small bowl. Let the mixture sit for about 5 to 10 minutes until it becomes foamy.
In a larger mixing bowl, combine the flour and salt.
Add the activated yeast mixture and olive oil to the flour mixture.
Mix until a soft dough forms. Then knead the dough on a lightly floured surface for about 5 to 7 minutes.
The dough should become smooth, elastic, and slightly soft.
Kneading helps develop gluten, which allows the pita to puff during cooking.
Rising, Shaping, and Cooking
Place the kneaded dough in a lightly oiled bowl and cover it with a towel or plastic wrap.
Allow the dough to rise for about one hour or until it doubles in size.
Once risen, gently punch down the dough and divide it into 6 to 8 equal pieces.
Roll each piece into a ball and flatten into circles about ¼ inch thick.
Heat a tawa or skillet over medium-high heat.
Place one dough circle onto the hot surface and cook for about 1 to 2 minutes. The pita should puff up and develop light golden spots.
Flip and cook the other side for another minute.
Remove the cooked pita and wrap it in a clean kitchen towel to keep it warm and soft.
Repeat with the remaining dough.
Tips for Perfect Pita Bread
Getting the Signature Puff
For pita bread to puff properly, the pan must be very hot.
A hot cooking surface creates instant steam inside the dough, which separates the layers and forms the pocket.
Rolling the dough evenly also helps ensure consistent puffing.
If the dough is rolled too thick or uneven, the pita may not puff fully.
Keeping Pita Soft and Fresh
After cooking, place the pita inside a clean kitchen towel. This traps steam and keeps the bread soft.
Store leftover pita in an airtight container at room temperature for up to two days.
For longer storage, freeze the pita in sealed bags. Reheat them briefly in a skillet or toaster when ready to use.
These storage methods help maintain the bread’s softness and flavor.
Frequently Asked Questions
Why didn’t my pita bread puff?
The pan may not have been hot enough, or the dough may have been rolled unevenly.
Can I use whole wheat flour?
Yes. You can replace part of the all-purpose flour with whole wheat flour for a nuttier flavor.
Can pita dough be made ahead?
Yes. The dough can be refrigerated after the first rise and used the next day.
Can I bake pita in the oven instead?
Yes. Baking on a very hot baking stone can also produce puffed pita pockets.
How do I reheat pita bread?
Warm it briefly in a skillet or wrap it in foil and heat in the oven.
Conclusion
Soft Homemade Pita Bread proves that fresh bread can be simple, quick, and incredibly rewarding. With only a few ingredients and a hot skillet, you can create soft, fluffy pita pockets perfect for wraps, sandwiches, and dips.
Because the recipe requires no oven and minimal preparation time, it is ideal for beginner and experienced bakers alike. The warm, flexible bread pairs beautifully with countless fillings and flavors.
Once you make your own Soft Homemade Pita Bread, it may quickly become one of your favorite homemade breads.

Equipment
- Mixing Bowl
- Rolling Pin
- Tawa or skillet
- Kitchen Towel
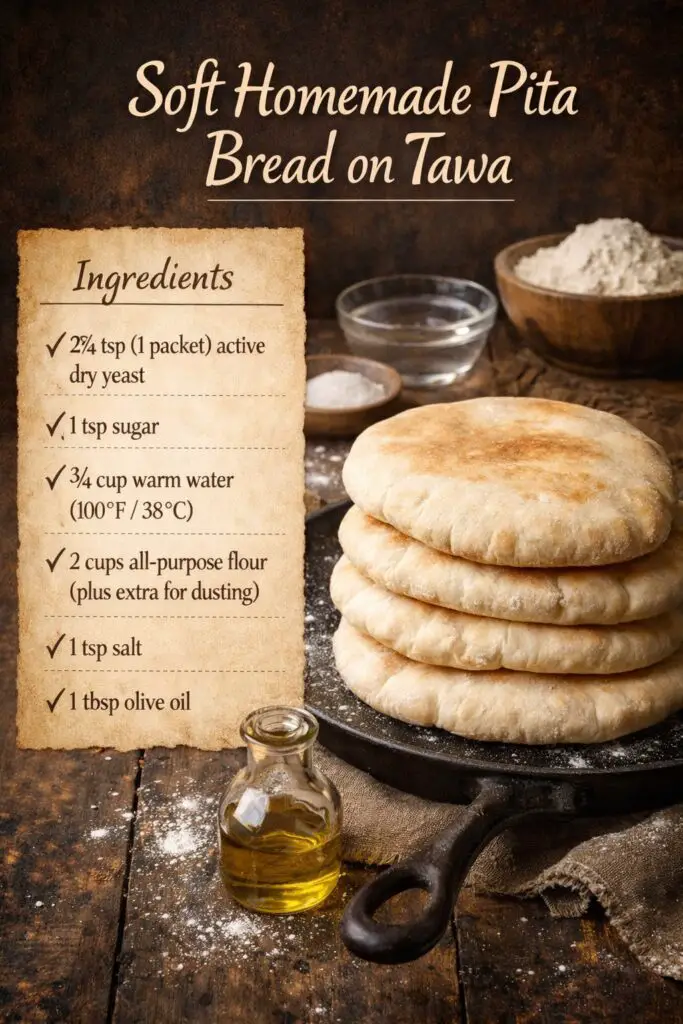
Ingredients
- 2 1/4 teaspoons active dry yeast
- 1 teaspoon sugar
- 3/4 cup warm water
- 2 cups all-purpose flour
- 1 teaspoon salt
- 1 tablespoon olive oil
Instructions
- Mix yeast, sugar, and warm water in a small bowl and let sit for 5–10 minutes until frothy.
- Combine flour and salt in a large bowl.
- Add the yeast mixture and olive oil to the flour and mix to form a dough.
- Knead the dough for 5–7 minutes until smooth and soft.
- Cover and let the dough rise for about 1 hour until doubled in size.
- Divide the dough into 6–8 pieces and roll each into 1/4-inch thick circles.
- Cook each pita on a hot tawa or skillet for 1–2 minutes per side until puffed and lightly golden.
- Wrap cooked pitas in a clean kitchen towel to keep warm and soft.


Leave a Reply