
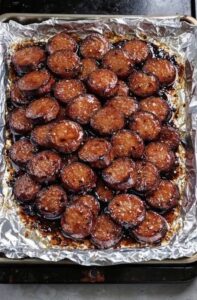
Candied Kielbasa Bites deliver the perfect blend of smoky sausage, sweet caramelized glaze, and a gentle kick of horseradish that turns a simple appetizer into an irresistible crowd-pleaser. Because this recipe uses only a handful of ingredients and requires minimal prep, Candied Kielbasa Bites fit effortlessly into busy schedules, potluck menus, and last-minute hosting needs. With their sticky glaze and deeply roasted flavor, these bites always disappear fast.
I first made Candied Kielbasa Bites for a family movie night when I needed a hearty appetizer with bold flavor but minimal effort. After tossing sliced kielbasa in a quick glaze and letting the oven do the work, the aroma filled the kitchen—sweet, tangy, smoky, and savory all at once. By the time the bites emerged caramelized and crisp around the edges, everyone had gathered around the counter waiting to sample them. Since then, this simplified version of Candied Kielbasa Bites has become one of my go-to recipes for gatherings because it’s reliable, easy, and universally loved.

Equipment
- Baking Dish
- Cutting board and knife
- mixing spoon
- Oven
Ingredients
- 2 lbs kielbasa sausage
- 1 cup brown sugar
- 1/2 cup ketchup
- 1/4 cup prepared horseradish
Instructions
- Preheat oven to 375°F (190°C).
- Slice kielbasa into 1-inch pieces and hasselback each by making shallow crosswise cuts without slicing through.
- Place sliced sausage in a baking dish and add brown sugar, ketchup, and horseradish. Mix to coat evenly.
- Bake 60–90 minutes, stirring every 20 minutes, until caramelized and crispy.
- Serve warm and enjoy.
Notes
Nutrition
What Makes Candied Kielbasa Bites So Addictive?
A Perfect Sweet-Tangy-Smoky Combination
Kielbasa already brings bold flavor with its smoky, garlicky profile. When roasted with brown sugar, ketchup, and horseradish, it transforms into a glossy, caramelized appetizer. The brown sugar melts into a sticky coating, while the ketchup adds acidity and depth. The prepared horseradish cuts the sweetness just enough, adding a gentle heat that doesn’t overwhelm the palate.
Because these flavors balance each other so well, the glaze becomes thick and candy-like during baking, creating a texture that clings beautifully to each piece of sausage.
Minimal Prep With Big Reward
Candied Kielbasa Bites require almost no chopping or measuring beyond slicing the sausage. Hasselback cuts—a series of shallow slices across each piece—allow the glaze to seep into every crevice. Once everything mixes in the baking dish, the oven handles the rest. Stirring every 20 minutes helps distribute the glaze evenly and ensures the bites crisp without burning.
This streamlined method makes the recipe ideal for gatherings where simplicity matters as much as flavor.
Choosing and Preparing the Kielbasa
What Type of Sausage Works Best
Traditional smoked kielbasa provides the richest flavor, but any fully cooked pork, beef, or turkey kielbasa works well. The sausage should be firm enough to hold its shape during roasting and fatty enough to caramelize properly. Lower-fat sausages may dry out slightly but still produce delicious results when coated generously.
Hasselback Slicing for Maximum Caramelization
Cutting each kielbasa piece into one-inch segments creates bite-sized portions. Making additional shallow cuts across the top enhances the finished texture. These hasselback-style slices expand slightly in the oven, trapping glaze between each layer for deeper flavor.
Because the sausage is already cooked, the roasting process focuses purely on caramelization and crisping, not internal cooking.
Creating the Candied Glaze
Simple Ingredients With Big Flavor
The glaze requires only three pantry staples: brown sugar, ketchup, and prepared horseradish. Brown sugar forms the sticky base that caramelizes in the oven. Ketchup adds body, acidity, and color. Horseradish provides tang and slight heat, balancing the sweetness.
As the dish bakes, the glaze thickens, darkens, and adheres to the sausage. Stirring ensures even coating and prevents the sugars from pooling in one area.
Adjusting the Heat Level
Prepared horseradish varies in intensity by brand. For milder heat, reduce the amount slightly or choose a mild version. For a spicier appetizer, mix in hot horseradish or add a pinch of cayenne to the glaze. Because the sausage and sugar soften the heat, the recipe encourages easy customization.
Baking for Perfect Results
Low Effort, High Reward Technique
Baking the sausage mixture at 375°F allows the glaze to bubble and caramelize without scorching. Stirring every 20 minutes helps redistribute the sugar mixture and prevents burning along the edges of the baking dish.
Candied Kielbasa Bites finish between 60 and 90 minutes depending on desired crispness. Shorter bake times produce softer, glossy pieces. Longer bake times create deeper caramelization and slightly crisp edges.
Serving Suggestions
These bites serve beautifully as party appetizers, game-day snacks, potluck dishes, or sweet-savory sides. They pair well with toothpicks for easy serving. For extra shine, spoon additional glaze from the pan over the top before serving.
FAQ
Can I make Candied Kielbasa Bites ahead of time?
Yes. Reheat them in the oven to restore crisp edges and reactivate the glaze.
Can I use turkey kielbasa?
Absolutely. The texture may be slightly firmer, but the flavor remains excellent.
How spicy are these bites?
The heat level is mild. Increase the horseradish if you prefer a stronger kick.
Can I double the recipe?
Yes. Use a larger baking dish or two pans to prevent overcrowding.
Can I use honey instead of brown sugar?
Brown sugar caramelizes best. Honey can soften the glaze rather than crisping it.
Conclusion
Candied Kielbasa Bites deliver irresistible sweet, smoky, and tangy flavor with almost no effort. Because the glaze thickens into a candy-like coating and the sausage crisps beautifully, the dish feels special without requiring advanced technique. Whether you prepare it for gatherings or quiet nights at home, this simplified Candied Kielbasa Bites recipe offers dependable, mouthwatering results every time.


Leave a Reply