I just have to start by saying thank you. Thank you for being here, for loving cozy recipes, and for appreciating the little joys that food brings into our lives. Today’s dish is something close to my heart — comforting, nostalgic, and honestly… just plain DELICIOUS. These golden, crispy-on-the-outside, tender-on-the-inside Stuffing Balls with Gravy are everything your fall and holiday table (or weeknight dinner) needs.
And if you’re anything like me — always looking for those magical recipes that combine ease with flavor — this one’s going to be on repeat.
💌 Want this recipe straight to your inbox (plus exclusive bonus content)? Don’t forget to subscribe to my recipe newsletter!
What Are Stuffing Balls?
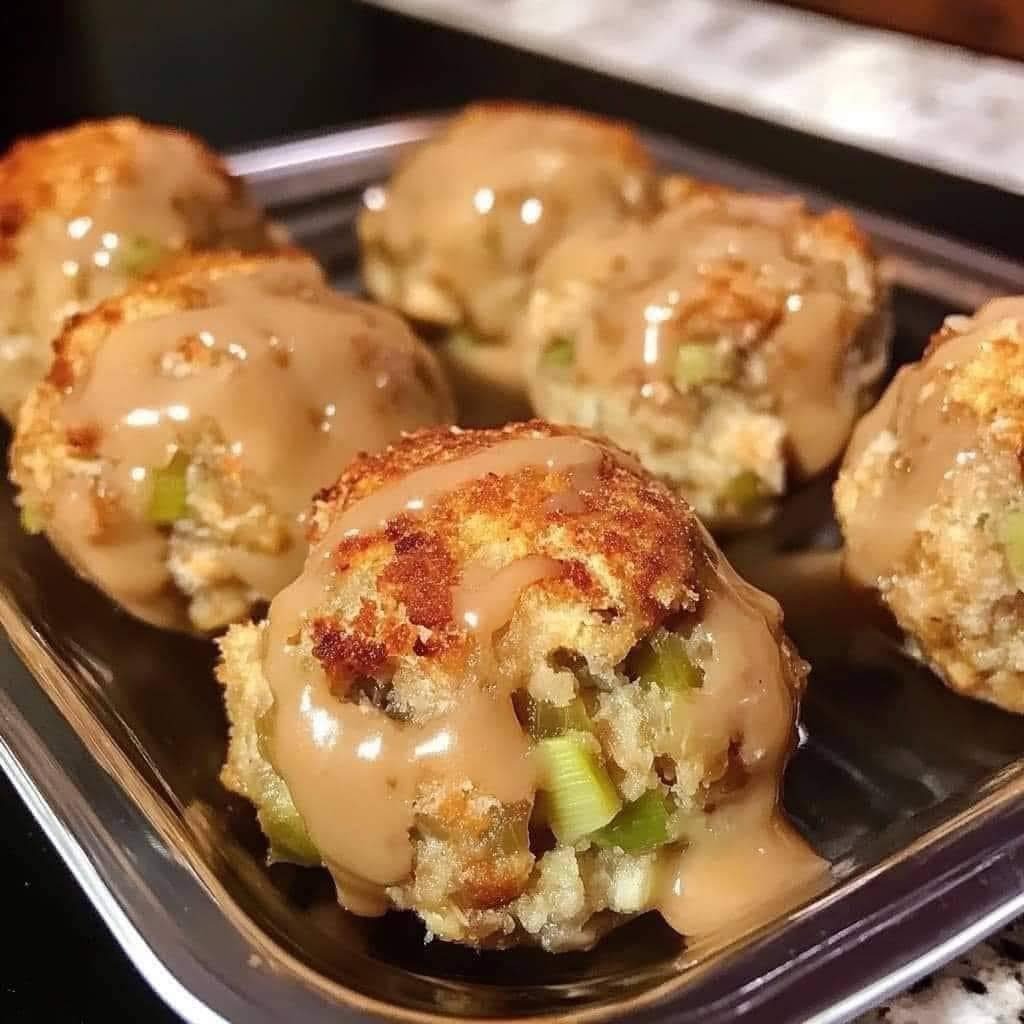
Think of these as the fun, portion-controlled, crispy cousin of classic stuffing. Made with bread cubes, sautéed veggies, and herbs, then baked until golden and drizzled with savory gravy — they’re everything you love about stuffing but in a handheld, crave-worthy form.
Why You’ll Fall In Love With These Stuffing Balls
- Perfectly crispy edges with a soft, fluffy interior
- Individual servings make for easy plating (and seconds!)
- Make-ahead friendly — perfect for meal prep or holiday planning
- Great for using up leftover stuffing (or making it from scratch!)
- Vegetarian-friendly (and can easily be made vegan!)
What Do They Taste Like?
The best way to describe them? Like Thanksgiving in every bite. You get that warm, herby aroma of sage and thyme, the buttery crunch from toasting, and the rich, savory hug of warm gravy melting into every crevice. They’re hearty, savory, and deeply satisfying — anything but boring!!
Benefits of Making These Stuffing Balls
- Crowd-pleaser: Both adults and kids adore these.
- Versatile: Great for holidays and weeknight dinners.
- Portable: Perfect for potlucks and parties.
- Customizable: Add-ins and variations galore (scroll down for ideas!).
Ingredients You’ll Need
- 1 bag (14-16 oz) cubed seasoned stuffing mix (or about 8 cups of stale bread cubes)
- 1/2 cup unsalted butter
- 1 medium onion, finely chopped
- 2-3 stalks celery, diced
- 2 cloves garlic, minced
- 2 1/2 cups vegetable or chicken broth (warm)
- 2 large eggs
- 1 tsp dried sage
- 1 tsp dried thyme
- Salt and pepper to taste
- Gravy (homemade or store-bought, for serving)
Tools You’ll Need
- Large skillet
- Large mixing bowl
- Baking sheet
- Parchment paper or silicone baking mat
- Cookie scoop or hands for forming balls
- Oven or air fryer
Optional Add-Ins & Substitutions
Want to make them your own? Here are some fun variations:
- Swap butter for olive oil to make them dairy-free.
- Add chopped mushrooms, dried cranberries, or sausage for extra flavor.
- Use egg replacer or flax eggs for a vegan version.
- Sprinkle shredded cheese inside for a cheesy twist.
- Drizzle with mushroom or onion gravy instead of traditional brown gravy.
How to Make Stuffing Balls (Step-by-Step)
1. Sauté Your Veggies
Melt butter in a skillet over medium heat. Add chopped onion and celery. Cook until softened (about 5-7 minutes). Stir in garlic, sage, thyme, salt, and pepper.
2. Mix It All Together
In a large bowl, add stuffing mix or bread cubes. Pour in sautéed veggie mixture. Whisk eggs and broth together, then pour over stuffing. Gently mix until well combined — the mixture should be moist but not soggy.
3. Shape the Balls
Let the mixture sit for 5-10 minutes to absorb. Scoop out 1/4 cup portions and form into balls using your hands or a cookie scoop.
4. Bake Until Golden
Preheat oven to 375°F (190°C). Line a baking sheet with parchment. Place stuffing balls a few inches apart. Bake for 25–30 minutes until golden brown and slightly crispy.
5. Serve with Gravy
Drizzle with warm gravy just before serving — or serve the gravy on the side for dunking!
What to Serve with Stuffing Balls
These pair beautifully with:
- Roasted turkey or chicken
- Green beans or Brussels sprouts
- Mashed potatoes
- Cranberry sauce
- A cozy fall salad
I even eat them for lunch with a little reheated gravy and a side of roasted vegetables. Heaven!!
Tips for Perfect Stuffing Balls
- Don’t overmix – gentle hands make fluffier balls.
- Let the mixture rest before forming — this helps with binding.
- Use a cookie scoop for evenly sized portions (and faster prep).
- Air fryer fans: You can air fry them at 375°F for about 12–15 minutes!
Storage Instructions
- Refrigerator: Store in an airtight container for up to 4 days.
- Freezer: Freeze baked (or unbaked) balls for up to 2 months.
- Reheating: Reheat in oven or air fryer for best texture. Microwave works in a pinch, too.
Frequently Asked Questions
Can I use leftover stuffing?
Absolutely! Just mix with a little broth and egg to help it bind, then form and bake.
Can I make these ahead of time?
Yes! Shape and chill the balls the day before, then bake when ready.
Are these gluten-free?
Use gluten-free bread or stuffing mix, and you’re golden!
Can I make these without eggs?
Yes — use a flax egg (1 tbsp ground flax + 3 tbsp water per egg) or your favorite egg substitute.
Conclusion
If you’re looking to shake up your holiday table or just want a delicious, cozy side dish that looks fancy but feels like home, these Stuffing Balls with Gravy are your answer. Crispy, savory, easy to make, and impossible to resist — you’ll wonder how you ever did the holidays without them.
I promised you versatile, and here’s proof!
More Cozy Recipes to Try Next
- Peach Glazed Chicken Thighs
- Peach Cornbread Muffins
- Skillet Peach Cobbler
- Savory Peach and Sausage Stuffing
Share the Love 💛
Tried this recipe? I’d LOVE to hear how it turned out!
👉 Leave a review below and pin your pics on Pinterest — tag me so I can see your creations!
Nutritional Info (Per Stuffing Ball – Approximate)
- Calories: 160
- Fat: 8g
- Carbs: 18g
- Protein: 3g
- Fiber: 1g
- Sodium: 350mg
Nutrition will vary depending on bread used, add-ins, and gravy.


Leave a Reply