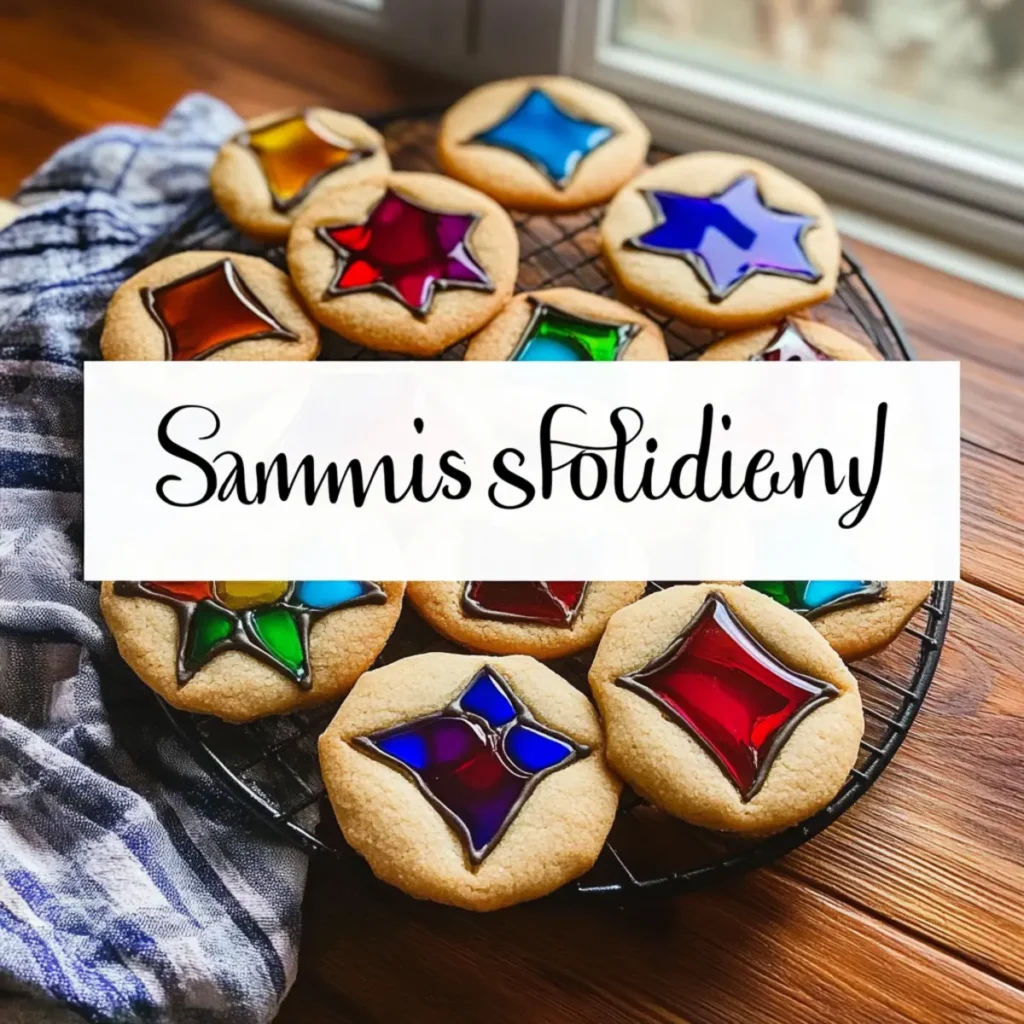
When the holiday season comes around, there’s a particular joy in adorning our homes with colorful, festive touches. I’ll never forget the day my niece and I embarked on a baking adventure, armed with cookie cutters and a pantry full of pastel candies. As the sweet scent of baking sugar cookies filled the air, our laughter echoed like the cheerful chimes of Christmas bells. That’s when we discovered the enchanting world of Stained Glass Cookies. Not only are these treats visually stunning, with vibrant candy centers that mimic the beauty of stained glass, but they also offer a delightful crunch and a rich sweetness.
Perfect for gifting, decoration, or simply indulging your sweet tooth, these cookies bring a burst of color and flavor to any celebration. With each bite, you’re transported back to those cherished moments in the kitchen! Join me as I share my go-to Stained Glass Cookies recipe that will warm your heart and wow your guests, making your festive gatherings even more special.

Why are Stained Glass Cookies a must-try?
Visual Appeal: These cookies truly dazzle with their vibrant colors, making them a showstopper for any occasion.
Delicious Flavor: The sweet, tender sugar cookie base beautifully complements the crunchy, melted candy center.
Fun to Make: Get creative with your cookie cutters and candy selections, making this a fun activity for kids and adults alike.
Perfect for Gifting: Beautifully packaged, these cookies make thoughtful gifts for friends and family during the holidays.
Versatile Decorating: Use them to adorn holiday trees, or enjoy them as a festive centerpiece at gatherings.
Bake up a batch of these stunning cookies and let the holiday spirit fill your home—it’s bound to become a sweet tradition!
Stained Glass Cookies Ingredients
For the Cookie Dough
• All-Purpose Flour – Provides structure to your cookies; ensure it’s properly measured for the best texture.
• Baking Powder – A lightening agent that helps the cookies rise, giving them a delicate texture.
• Salt – Enhances the sweetness and balances the flavors in this Stained Glass Cookies recipe.
• Unsalted Butter – Adds richness; make sure it’s softened for easy mixing and a tender cookie.
• Granulated Sugar – Sweetens the dough while helping create that perfect crispy edge.
• Large Egg – Binds everything together and adds moisture; best to use at room temperature.
• Vanilla Extract – Infuses depth of flavor; consider almond extract for a unique twist.
For the Candy Center
• Assorted Hard Candies – Creates the stained glass effect; crush into small pieces and keep colors separate for a vibrant finish.
For Dusting
• Powdered Sugar – Optional, but it adds a lovely festive touch when dusted over the finished cookies.
For Ornamenting (if desired)
• Ribbon or String – Use this to turn your cookies into beautiful hanging ornaments for holiday décor.
How to Make Stained Glass Cookies
-
Prepare Dough: Cream the softened butter and granulated sugar together until light and fluffy, about 2-3 minutes. Add in the egg and vanilla (or almond extract) and mix until smooth. In another bowl, sift flour, baking powder, and salt; gradually mix this dry mixture into the butter until just blended.
-
Chill Dough: Wrap the cookie dough tightly in plastic wrap and refrigerate for at least 1 hour. This helps firm up the dough for easier rolling.
-
Roll and Cut: After chilling, gently roll the dough on a floured surface to approximately ¼ inch thickness. Use cookie cutters for the outer shapes and a smaller cutter for the center cutout.
-
Crush Candies: Take assorted hard candies and crush them by color into small pieces, ensuring to keep them separated for a colorful effect.
-
Assemble Cookies: Place the cut cookies on a parchment-lined baking sheet. Carefully spoon crushed candy into the center of each cutout, taking care not to overfill them.
-
Bake: Bake your cookies in a preheated oven at 350°F (175°C) for 8-10 minutes. Look for golden edges and melted candy centers.
-
Cool: Allow the cookies to cool on the sheet for a few minutes before transferring them to a wire rack. If you plan to use them as ornaments, poke holes while they are still warm.
-
Finish: Dust the cooled cookies with powdered sugar for that extra festive touch, and consider tying a ribbon through the holes for decorative hanging.
Optional: For a twist, add colorful sprinkles on top before baking for extra flair.
Exact quantities are listed in the recipe card below.

What to Serve with Stained Glass Cookies?
These vibrant delights are sure to brighten up your festive spread, creating a magical atmosphere filled with sweetness and color.
- Rich Hot Chocolate: This warm, creamy drink adds a cozy element, perfectly complementing the sweetness of the cookies while providing an extra layer of indulgence.
- Spiced Chai Latte: The warm spices in chai harmonize beautifully with the cookie’s sweet flavors, offering a comforting, festive drink for chilly days.
- Nutty Biscotti: Crunchy and slightly sweet, these provide a delightful contrast in texture while their flavors pair nicely with the cookies.
- Fresh Fruit Salad: A refreshing mix of seasonal fruits balances the sweetness of the cookies and adds a hint of natural tartness.
- Peppermint Ice Cream: The cool, minty flavor creates a festive contrast that brightens each bite of cookie, making it a delightful holiday treat.
- Mulled Cider: Warm spiced apple cider serves as an aromatic drink that beautifully enhances the cheerful vibes of your cookie platter.
For a delightful twist, consider presenting a dessert platter featuring some of these pairings along with the cookies. The combination of flavors will surely impress your family and friends!
Expert Tips for Stained Glass Cookies
-
Butter Softness: Ensure your butter is softened to room temperature before mixing; this helps create a smooth dough without risking toughness.
-
Candy Crushing: Use a hammer or rolling pin to crush hard candies, but keep each color separate for a more vibrant stained glass look.
-
Chill Carefully: Don’t skip the chilling step! It’s essential to firm up the dough, making rolling and cutting easier for your Stained Glass Cookies.
-
Watch the Bake: Keep a close eye on your cookies while baking; overbaking can lead to dark edges and cloudy centers in the candy.
-
Cooling Tip: Allow cookies to cool briefly on the baking sheet before transferring them to a wire rack to prevent breakage.
Stained Glass Cookies Variations
Explore delightful twists on this classic recipe to suit your taste and creativity!
- Almond Extract: Substitute almond extract for vanilla for a warm, nutty flavor that elevates your cookies.
- Candy Choices: Experiment with different hard candies, like Jolly Ranchers or Lifesavers, for unique colors and tastes. Vibrant hues make each batch a delightful discovery!
- Gluten-Free: Swap all-purpose flour for a gluten-free blend to accommodate dietary restrictions while still enjoying these festive treats.
- Spiced Version: Add a teaspoon of cinnamon or ginger to the dough for a warm, spiced flavor that’s perfect for the holiday season.
- Chocolate Chips: Fold in mini chocolate chips to the dough for an extra layer of deliciousness and a chocolatey surprise inside every bite.
- Decorative Sprinkles: Before baking, sprinkle colored sugar or festive sprinkles on top for an extra pop of color and texture.
- Citrus Zest: Mix in the zest of an orange or lemon to create a refreshing twist, brightening up the flavors of these cookies.
- Nutty Crunch: Fold in finely chopped nuts, such as almonds or pecans, for added crunch and a delightful taste contrast to the sweet candy centers.
Let your imagination run wild and create a cookie that tells your unique story!
Make Ahead Options
These Stained Glass Cookies are perfect for busy home cooks who love meal prep! You can prepare the cookie dough up to 24 hours ahead of time by tightly wrapping it in plastic wrap and refrigerating. This chilling step not only firms up the dough for easy rolling but also enhances the flavors. Additionally, you can crush the assorted hard candies and keep them stored in an airtight container for up to 3 days. When you’re ready to bake, simply roll, cut, fill with candy, and follow the baking instructions. With these make ahead options, you’ll have stunning, delicious cookies ready at a moment’s notice—ideal for holiday celebrations!
How to Store and Freeze Stained Glass Cookies
Room Temperature: Store cookies at room temperature in a single layer within an airtight container for up to 3 days. This will keep them fresh and prevent them from becoming too soft.
Fridge: For extended freshness, store cookies in the refrigerator, layered with parchment paper. They can last up to a week, but may lose some crunchiness.
Freezer: To freeze, arrange cookies in a single layer on a baking sheet, freeze until solid, then transfer to a freezer-safe container, layering with parchment paper. They can be kept for up to 3 months.
Reheating: To enjoy frozen cookies, simply thaw at room temperature or reheat in the oven at 300°F (150°C) for 5-7 minutes to refresh their texture.

Stained Glass Cookies Recipe FAQs
How do I choose the best hard candies for the stained glass effect?
Absolutely! For the best results, pick candies that melt well such as Jolly Ranchers or Life Savers. Make sure to keep the colors separate when crushing them to maintain a vibrant look in your cookies. Avoid candies that contain chocolate or those with high moisture content, as they may not provide the desired clarity.
What’s the ideal way to store Stained Glass Cookies?
For optimal freshness, store your cookies at room temperature in a single layer within an airtight container. They’ll stay delicious for up to 3 days. To prevent them from getting too soft, avoid stacking them directly on top of one another, and consider placing parchment paper between layers if you need to stack.
Can I freeze Stained Glass Cookies?
Yes, you can definitely freeze these cookies! To do so, first lay them in a single layer on a baking sheet and freeze until solid. Then, transfer them to a freezer-safe container, layering with parchment paper to protect the candy center. They can be stored for up to 3 months. When you’re ready to enjoy them, just thaw at room temperature or reheat in the oven at 300°F (150°C) for 5-7 minutes.
What should I do if my candy centers are cloudy?
The more the merrier! If your cookie centers turn out cloudy, it might be due to overbaking or caramelization of the candy. Be sure to watch the baking time closely—generally, around 8-10 minutes at 350°F (175°C) is ideal. If you notice the candy starting to bubble excessively, you may want to take them out early.
Are there any allergies I should consider when making these cookies?
Definitely! Make sure to check for allergies with your guests before serving. Common allergens in this recipe include butter, eggs, and sometimes nuts if you decide to use almond extract. You can create a nut-free version by simply omitting the almond extract, or consider using allergen-free substitutes, such as applesauce for eggs.
How can I improve the texture of my cookies?
To ensure a delightful texture, start with softened butter and blend it thoroughly with sugar until light and airy. Also, don’t rush the chilling step—about an hour in the refrigerator will help the dough firm up, making it easier to roll out and cut. Lastly, be patient while baking; it’s better to underbake slightly than to overbake, to maintain that semi-soft center!

Irresistibly Festive Stained Glass Cookies Recipe - Emma's Cake Studio
Equipment
- Mixing Bowl
- Rolling Pin
- cookie cutters
- baking sheet
- Parchment Paper
Ingredients
For the Cookie Dough
- 2 3/4 cups All-Purpose Flour Ensure it's properly measured for the best texture.
- 1 teaspoon Baking Powder A lightening agent for delicate texture.
- 1/4 teaspoon Salt Enhances sweetness and balances flavors.
- 1 cup Unsalted Butter Softened for easy mixing.
- 1 cup Granulated Sugar Sweetens the dough.
- 1 large Egg Best to use at room temperature.
- 1 teaspoon Vanilla Extract Infuses depth of flavor.
For the Candy Center
- 1 cup Assorted Hard Candies Crushed into small pieces.
For Dusting
- Powdered Sugar Optional for festive touch.
For Ornamenting (if desired)
- Ribbon or String For turning cookies into hanging ornaments.
Instructions
How to Make Stained Glass Cookies
- Cream the softened butter and granulated sugar together until light and fluffy, about 2-3 minutes. Add in the egg and vanilla (or almond extract) and mix until smooth. In another bowl, sift flour, baking powder, and salt; gradually mix this dry mixture into the butter until just blended.
- Wrap the cookie dough tightly in plastic wrap and refrigerate for at least 1 hour.
- After chilling, gently roll the dough on a floured surface to approximately ¼ inch thickness. Use cookie cutters for the outer shapes and a smaller cutter for the center cutout.
- Take assorted hard candies and crush them by color into small pieces.
- Place the cut cookies on a parchment-lined baking sheet. Carefully spoon crushed candy into the center of each cutout.
- Bake your cookies in a preheated oven at 350°F (175°C) for 8-10 minutes.
- Allow the cookies to cool on the sheet for a few minutes before transferring them to a wire rack.
- Dust the cooled cookies with powdered sugar for that extra festive touch.


Leave a Reply