Why Make This Recipe
Halloween is a time for fun, creativity, and a little bit of spookiness. Easy Mini Halloween Pizzas bring the holiday spirit right into your kitchen! These pizzas are not just tasty; they also let you create festive and fun designs that kids will love. You can customize each pizza to look like ghosts, mummies, spiders, or even jack-o’-lanterns. This is a great way to involve family and friends in the cooking process and make lasting memories together. Plus, they are easy to make and bake quickly, making them perfect for a Halloween party or snack.
How to Make Easy Mini Halloween Pizzas
Making Easy Mini Halloween Pizzas is simple and fun! Here is a step-by-step guide to get you started.
Ingredients
Base
- 4–6 mini pizza crusts, English muffins (split), naan rounds, or small flour tortillas
- ¾ to 1 cup pizza sauce (homemade or jarred)
Cheese & ‘Costume’ Elements
- 1½ cups shredded mozzarella cheese
- 4–6 slices mozzarella or provolone (for ghosts or mummy strips)
- ¼ cup grated Parmesan (optional for extra flavor)
Toppings for Halloween Designs
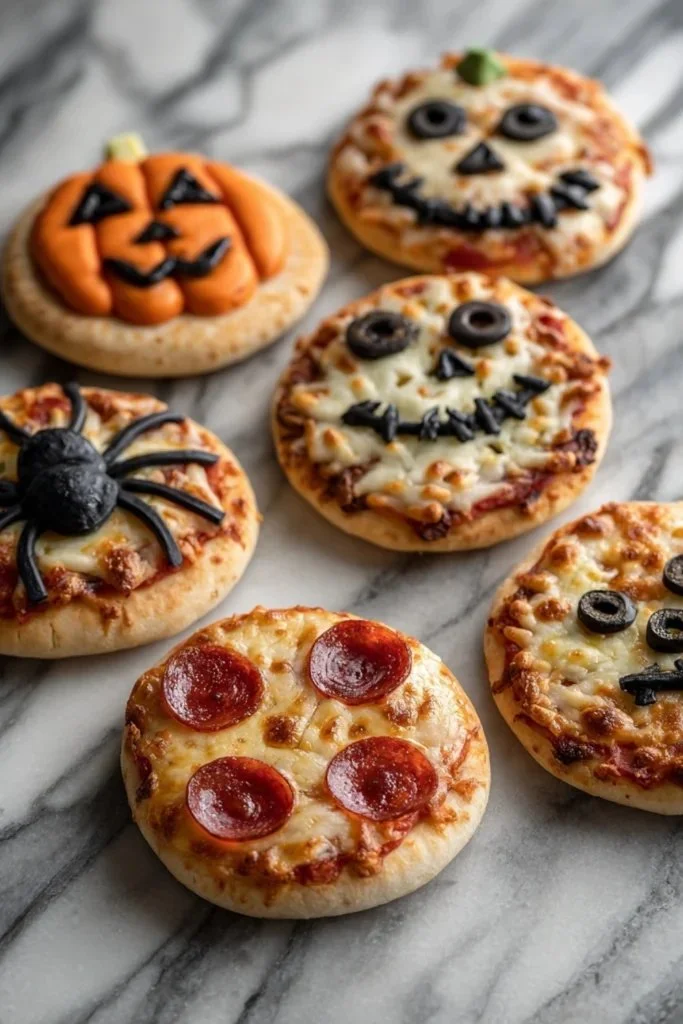
- Mummy Pizzas: sliced mozzarella/provolone bandage strips, olives or mini pepperoni for eyes
- Ghost Pizzas: mozzarella slices cut into ghost shapes, black olive bits or peppercorns for eyes
- Spider Web Pizzas: pizza sauce base, thinly piped ranch dressing or sour cream, shredded mozzarella for a web, whole black olives (body) and sliced olive pieces for legs
- Jack-O’-Lantern Pizzas: slices of orange cheddar or Colby-Jack cheese cut into pumpkin shapes, black olive or green pepper pieces for eyes, nose, mouth, and stem
Other Optional Toppings
- diced bell peppers
- mushrooms
- mini pepperoni
- cooked sausage crumbles
- spinach
- red onion
Seasoning (Optional)
- 1 teaspoon Italian seasoning or dried oregano
- Pinch of red pepper flakes
Olive oil
- For spraying or brushing
Required Kitchen Tools
- Baking sheet lined with parchment
- Small knife
- Cutting board
- Small cookie cutters (optional)
- Spoon for sauce
- Piping bag or zip-top bag (for spider web effect)
Directions
-
Preheat the oven to 425°F (220°C). Line a baking sheet with parchment paper. If you use English muffins or tortillas, lightly mist or brush them with olive oil to get crisper bases.
-
Prepare the bases: Arrange your mini crusts on the baking sheet. Spread 1–2 tablespoons of pizza sauce on each one, leaving a little border around the edge. Sprinkle a light layer of shredded mozzarella over the sauce to help other toppings stick.
-
Create Halloween designs:
- For Mummy Pizzas, lay mozzarella strips across the sauce like bandages and add olives for eyes.
- For Ghost Pizzas, place a ghost-shaped mozzarella slice and add eyes with olives.
- For Spider Web Pizzas, either arrange mozzarella shreds in a web pattern or bake and then pipe ranch or sour cream to form a web. Place a whole olive for the spider’s body and cut extra olives into legs.
- For Jack-O’-Lantern Pizzas, top with pumpkin-shaped cheddar slice and use olives or pepper pieces for facial features. Add a green pepper piece for the stem.
-
Add other toppings: Use optional toppings sparingly so your designs stay visible.
-
Bake: Put the baking sheet in the oven and bake for 8–12 minutes until the cheese melts and the edges are crisp. The times may vary depending on the type of base you use.
-
Add final details: If you made the spider web pizza, pipe ranch or sour cream after baking. Let the pizzas cool for 2–3 minutes to set.
-
Serve warm: Arrange the pizzas by character or on a large platter. Store any leftovers in the fridge for 2–3 days.
How to Serve Easy Mini Halloween Pizzas
You can serve these pizzas warm, either on their own or as part of a Halloween-themed snack platter. You can arrange them by character, which makes them fun and inviting. Kids and adults alike can pick their favorite design. They are great for parties, movie nights, or a fun family dinner.
How to Store Easy Mini Halloween Pizzas
If you have any leftovers, store them in an airtight container in the fridge. They will stay fresh for 2–3 days. To reheat, you can use an oven or toaster oven to keep the crust crispy. Avoid using the microwave, as it can make the crust soggy.
Tips to Make Easy Mini Halloween Pizzas
-
Use uniform bases: This keeps baking times consistent, ensuring all pizzas are cooked evenly.
-
Don’t overload toppings: Keep toppings light to maintain the designs and prevent sogginess.
-
Chill cheese shapes: Putting cheese in the fridge for a little while before cutting helps you get cleaner shapes.
-
Stability of eyes: Make sure toppings like olives stay in place. You can use small pieces of cheese to help them stick.
-
Substitutions: If you have dietary restrictions, feel free to swap out ingredients as needed. Use gluten-free crusts or dairy-free cheese to suit your needs.
Variation
You can change up the pizza designs to match different holidays or themes. For example, you could make Christmas trees with green pesto, cheese, and bell peppers or heart shapes for Valentine’s Day. The possibilities are endless!
FAQs
Q: Can I use different types of cheese?
A: Yes, you can use any cheese you like! Just make sure it melts well. Cheddar and gouda are great options.
Q: How do I get my kids involved in making these pizzas?
A: Kids can help spread the sauce, arrange the cheese, and create the fun designs. It’s a great way to encourage creativity in the kitchen!
Q: Can I make these pizzas ahead of time?
A: You can prepare the pizzas and keep them in the fridge before baking. Just bake them when you’re ready to serve!
Conclusion
Making Easy Mini Halloween Pizzas is a fun and creative way to celebrate the holiday. You get to enjoy delicious flavors while letting your imagination run wild with spooky designs. It’s a simple recipe that brings family and friends together in the kitchen. So grab your ingredients and start creating your Halloween masterpieces! Enjoy your tasty treats!

Easy Mini Halloween Pizzas
Ingredients
Base
- 4-6 pieces mini pizza crusts, English muffins (split), naan rounds, or small flour tortillas
- ¾ to 1 cup pizza sauce (homemade or jarred)
Cheese & ‘Costume’ Elements
- 1½ cups shredded mozzarella cheese
- 4-6 slices mozzarella or provolone (for ghosts or mummy strips)
- ¼ cup grated Parmesan (optional for extra flavor)
Toppings for Halloween Designs
- Mummy Pizzas: sliced mozzarella/provolone bandage strips, olives or mini pepperoni for eyes
- Ghost Pizzas: mozzarella slices cut into ghost shapes, black olive bits or peppercorns for eyes
- Spider Web Pizzas: pizza sauce base, thinly piped ranch dressing or sour cream, shredded mozzarella for a web, whole black olives (body) and sliced olive pieces for legs
- Jack-O’-Lantern Pizzas: slices of orange cheddar or Colby-Jack cheese cut into pumpkin shapes, black olive or green pepper pieces for eyes, nose, mouth, and stem
Other Optional Toppings
- diced bell peppers
- mushrooms
- mini pepperoni
- cooked sausage crumbles
- spinach
- red onion
Seasoning (Optional)
- 1 teaspoon Italian seasoning or dried oregano
- a pinch red pepper flakes
Olive oil
- for spraying or brushing
Instructions
Preparation
- Preheat the oven to 425°F (220°C). Line a baking sheet with parchment paper. If you use English muffins or tortillas, lightly mist or brush them with olive oil to get crisper bases.
Assembling the Pizzas
- Arrange your mini crusts on the baking sheet. Spread 1–2 tablespoons of pizza sauce on each one, leaving a little border around the edge. Sprinkle a light layer of shredded mozzarella over the sauce to help other toppings stick.
- For Mummy Pizzas, lay mozzarella strips across the sauce like bandages and add olives for eyes.
- For Ghost Pizzas, place a ghost-shaped mozzarella slice and add eyes with olives.
- For Spider Web Pizzas, either arrange mozzarella shreds in a web pattern or bake and then pipe ranch or sour cream to form a web. Place a whole olive for the spider’s body and cut extra olives into legs.
- For Jack-O’-Lantern Pizzas, top with pumpkin-shaped cheddar slice and use olives or pepper pieces for facial features. Add a green pepper piece for the stem.
Baking
- Put the baking sheet in the oven and bake for 8–12 minutes until the cheese melts and the edges are crisp. The times may vary depending on the type of base you use.
- If you made the spider web pizza, pipe ranch or sour cream after baking. Let the pizzas cool for 2–3 minutes to set.
Serving
- Arrange the pizzas by character or on a large platter. Store any leftovers in the fridge for 2–3 days.


Leave a Reply